
Mastering Flat Frames (2/3): Flat Panels compared
In a series of three blogs, I am sharing my experiences from a deep dive into mastering Flats. What started with some basic questions on what would be a good flat panel for a new large aperture telescope, and which gain and darks to use for my Flats and why, ended in multiple experiments with sometimes unexpected results.
These experiments gave a better understanding of my Flat frames and helped mastering my Flat panels. And hopefully they can help you in making better informed decisions about how you would like to take your Flat frames. The three topics are which Gain settings to use, which Dark frames to use and which Flat Panel to use. Today’s article is all about the panels. It looks at characteristics of four quite different types of Flat panels that are often used and compares their performance.
The next article will be about Bias and Flat Darks. So, don't miss out! Subscribe to the newsletter to stay up to date with these and other new postings.

The Flat panels that are compared in this article. From left to right they are the Alnitak FlipFlat, a generic A4 Light tracing pad, the Pegasus Astro FlatMaster and the Gerd Neumann Aurora Flatfield panel.
Light sources
To take Flats you need to have an evenly illuminated light source in front of the telescope. This can be as simple as pulling a white T-shirt over the tube opening and use the sky at dawn/dusk as the source of illumination. For more flexibility a Flat panel is often used as light source. A tracing LightPad or tablet will work, but there are also numerous dedicated Flat panel for astrophotography available. Some come with (automatic) brightness adjustments to have more control over exposure times for each filter. The light source in these Flat panels is either a LED or electroluminescence (EL) panel.
Flat panels
The Flat panels tested in this comparison represent four quite different panels, but represent different types of panels typically seen in astrophotography. This is a fully independent comparison, none of the manufacturers have asked me to do this and all panels have been bought by myself at normal retail prices. Be informed that while this article will give some of my personal opinions, your situation may be very different and for your situation you may come to very different conclusions.
Aurora Flatfield panel
These panels are produced by Gerd Neumann in Germany. They come in a range of sizes and the version tested here has a diameter of 220mm illuminated field. They go up to pretty large panels of 420mm diameter and on request even 600mm. The panel is pretty lightweight and is placed on top of the telescope while pointing to the zenith. The light source is an EL panel. They can be powered using either a 12V or a 220V inverter. Other than a very tiny adjustment of the inverter, the brightness can not be adjusted. Neumann does offer ND filters in different strengths though, that can be sandwiched between the EL source and the diffuser panel. While easy to do, it is not something you want to do in the field. The wires coming from the panel are rather thin and fragile, but they turn out to be surprisingly solid. At a price of approximately €160, the panel is cheaper than most other dedicated Flat panels.
Flatmaster 150
The FlatMaster panels are produced by Pegasus Astro in Greece and come in two sizes, 150 and 250mm illuminated field. They are LED panels and powered through a USB-B cable. There is a manual switch to change brightness of the panel in 5 levels. But if the USB cable is connected to a computer, brightness can also be changed in software. Using the available INDI and ASCOM drivers, brightness can be adjusted on a scale from 0 to 100. Unfortunately using the INDI driver, any setting of 15 or lower effectively turns off the panel. It is unclear whether this is a shortcoming in software, or by design. A practical feature is the three ‘feet’ that come with the panel. It allows to hold the panel in place when it is on top of the scope. Just a bit more resistent to an occasional bump. The FlatMaster comes with a practical pouch to keep the panel clean and safe when not in use. It can be found for a retail price of around €200-250.
Alnitak FlipFlat
The FlipFlat is originally produced by a company called Alnitak, which is currently owned by Optec Inc in the US. The FlipFlat comes in three sizes for telescopes up to 200mm. The model used here is the second-largest version with an illuminated surface of 190mm. The light source is an EL panel and is powered through a USB-B connection. There are INDI and ASCOM drivers available and brightness can be fine-adjusted using 250 different levels. The unique aspect of this panel is that it is a motorised panel. It is fixed on the top of the OTA using a very solid tie-wrap. And using a motorised arm, the panel can be place on and off the scope. In this way it also functions as a dust cap, ideal for remote observatories. I have used the FlipFlat from the start and it sure is a very flexible panel. However, in open position during imaging, the panel acts as a pretty sensitive wind catcher, sometimes leading to unwanted vibrations in the OTA. Also, the white glossy surface of the panel can reflect nearby light sources, or moonlight into the telescope. And after a night of imaging with the panel open, the whole panel can be frosted with ice, which first requires de-icing before taking flats. Overall this panel is probably best used in a dome/observatory. For a non-permanent setup in the backyard, the benefits probably do not outweigh its downsides. The panel is by far the most expensive of all panels tested, with a local price of around €750.
LightPad
The last panel in the test is a tracing LightPad, A4 size (21x31cm). There are many different versions of them and many don’t even have a brand name. Mine comes from a local online retailer, but you can find many similar ones on Amazon. They are always LED panels and are typically powered by USB, in this case a micro-USB connection. This version can be manually adjusted in three different levels of brightness. These panels are extremely cheap when you compare them to dedicated Flat panels and are available in large sizes, up to A2 (45x65cm). Just like the Aurora panel, a LightPad is just placed on top of the OTA pointing to the zenith, with no further support. Panels like these are very cheap and usually don’t cost more than about € 30-50.
Setup
Testing of the four Flat panels was done with one of the telescope rigs that is regularly used for imaging. This rig consists of a Takahashi TOA-130NFB refractor with FL67 flattener. Camera was a ZWO ASI533MM Pro with ZWO EFW 8-position filter wheel. Filters were all 1.25” mounted Astrodon filters. Broadband filters were the E-series True balance filters. The narrowband filters were 5nm H-alpha, OIII and SII filters. The rig was controlled using KStars/Ekos software with INDI drivers running on a Fitlet2 mini-computer running Linux Mint 20.04. For power- and data-distribution, a Pegasus Ultimate PowerBox V2 was used.
Banding
The Flat panels have two distinctly different light sources. The Aurora and FlipFlat use an electroluminescence panel. The FlatMaster and the LightPad use LED lighting. LED lighting has one characteristic that should be specifically taking into account when using it for a Flat panel. The way brightness of a LED lamp is controlled, is by switching it on and off at high frequency. How long it is on or off determines its brightness. This is called PulseWidthModulation (PWM). The human eye cannot see this blinking and just sees a constant light source. But the shutter of a camera records it very well, especially at short shutter speeds. On an image this is visible as horizontal banding. So a LED panel should always be exposed long enough to not see any banding. How long this is, depends on the electronics of the panel.
For the LightPad for example exposures between 0.01 and 0.1s showed very minor banding. Anything longer than 0.1s shows no banding at all (see images below). In principle banding is a random effect and should be reduced or even eliminated with stacking. However, even stacking 25 frames of 0.01s still showed some remaining banding. For the LightPad, an exposure time of 0.1s is therefore considered the minimum. The brightest Flat (Luminance at Gain 100) is set to meet that threshold.

The LightPad shows some fine banding at 0.01s exposure time. This does not completely eliminate by stacking. At 0.1s there is no visible banding and a stack of 25 images looks very clean.
The FlatMaster however shows severe banding. At 1s exposures it is always visible and even at 2.5s it is sometimes visible. This banding is a random effect, so it is reduced by stacking. But as we will see later, stacks of 10 frames at 2.5s still show banding. Stacks of 25 frames at 2.5s may be safe, but it’s probably better to build in a bit of a cushion. And this is a concern. Flats are calibration frames and are designed to remove artefacts. So any risk of introducing artefacts defeats its purpose. This behaviour of the FlatMaster was quite a surprise. I wrote a post on the Pegasus Astro forum, which did not result in any replies. I also submitted a support ticket to Pegasus Astro. Their suggestion was to change the brightness profile. This cannot be done using INDI, but in the Pegasus Unity app there is an option to change the profile to for example ‘High’ or ‘Boost’. While this changed indeed the banding pattern, it did not remove or reduce it. In fact, because the profiles lead to brighter illumination, it required shorter exposure times, making the banding even worse. For a product designed for astrophotography one would expect that this is better under control. Especially since a much cheaper LightPad hardly suffers from this issue.

The FlatMaster shows severe banding. Both at 1 and 2.5s exposure times, the banding is clearly visible in single frames. Even stacking 25 frames does not eliminate the effect completely and consistently. Better would be to use even longer exposures, or larger stacks.
Correct exposure settings
One thing that makes a Flat panel suitable to be able to get reasonable exposures at the proper Gain settings for each filter. Reasonable here probably means anything between a fraction of a second to less than half a minute. A broadband luminance filter passes through most light, so will have the shortest exposures. But a 5nm H-alpha narrow-band filter will pass through much less light. Adjusting the Gain and/or the brightness of the panel are a great help to find the proper exposures. After some experimenting within the flexibility of each panel, the below table lists the exposure settings I settled for per filter for each of the Flat panels. For LRGB filters exposures are are listed for both Gain 0 and Gain 100. This is to to allow HCG-mode matching for corresponding Light frames. Exposures are set to achieve a target exposure between 22,000 and 26,000 ADU. For Flat panels with brightness control, the last number represents the brightness setting in software (INDI).
| Filter | Aurora | FlatMaster | FlipFlat | LightPad* |
|---|---|---|---|---|
| Luminance | 0.3 s / Gain 0 | 2.5 s / Gain 0 / 18 | 2.5 s / Gain 0 / 45 | 0.4 s / Gain 0 |
| Red | 5.0 s / Gain 0 | 2.5 s / Gain 0 / 30 | 10 s / Gain 0 / 250 | 5.0 s / Gain 0 |
| Green | 1.5 s / Gain 0 | 2.5 s / Gain 0 / 21 | 2.5 s / Gain 0 / 250 | 1.3 s / Gain 0 |
| Blue | 0.7 s / Gain 0 | 2.5 s / Gain 0 / 21 | 2.5 s / Gain 0 / 110 | 0.6 s / Gain 0 |
| Luminance | 0.1 s / Gain 100 | 2.5 s / Gain 100 / 17 | 2.5 s / Gain 100 / 22 | 0.12 s / Gain 100 |
| Red | 1.5 s / Gain 100 | 2.5 s / Gain 100 / 22 | 4.0 s / Gain 100 / 250 | 1.5 s / Gain 100 |
| Green | 0.5 s / Gain 100 | 2.5 s / Gain 100 / 18 | 2.5 s / Gain 100 70 | 0.5 s / Gain 100 |
| Blue | 0.2 s / Gain 100 | 2.5 s / Gain 100 / 18 | 2.5 s / Gain 100 / 45 | 0.2 s / Gain 100 |
| H-alha (5nm) | 3.0 s / Gain 300 | 2.5 s / Gain 100 / 70 | 6.0 s / Gain 300 / 250 | 6.0 s / Gain 200 |
| OIII (5nm) | 0.5 s / Gain 300 | 2.5 s / Gain 100 / 40 | 3.0 s / Gain 300 / 250 | 1.7 s / Gain 200 |
| SII (5nm) | 5.0 s / Gain 300 | 2.5 s / Gain 100 / 100 | 10 s / Gain 300 / 250 | 8.0 s / Gain 200 |
*Added to the LightPad are three sheets of 80 grams white A4 paper. The panel is too bright to have long enough exposures to eliminate banding.
There are three variables that can be changed to achieve the target exposure: Exposure time, Brightness and Gain. Unfortunately, there are limitations for each of them, and they are different for each panel.
The Exposure times for the EL panels (Aurora and FlipFlat) has the highest flexibility. They can be as short (or long) as needed without any negative effect on the quality of the Flat frame. The LED panels however suffer from the banding issue. For the LightPad this means that a minimum of 0.1s is required. For the brightest exposure (Luminance at Gain 100), this required attenuating the brightness of the panel. This was done by adding three sheets of white A4 paper. For the FlatMaster 2.5s is the absolute minimum, and ideally even longer.
The Brightness of the FlatMaster and the FlipFlat can be adjusted, which gives more flexibility. But even at the highest setting, the exposure time of the Red filter at Gain 0 is 10s. This indicates that the FlipFlat is a fairly dim panel. The other EL panel, the Aurora, is about twice as bright which helps keeping the exposure times shorter. Both LED panels are fairly bright. As mentioned before, the LightPad could only be used with three sheets of paper. The FlatMaster could only just be used for the brightest exposure (Luminance at Gain 100). The brightness setting is then almost at its lowest (17). A setting of 16 is the lowest, as 15 and below effectively switches off the panel. And exposure should be a minimum of 2.5s. For the f/7.7 system used here it just works. But when using faster systems, the FlatMaster may require additional dimming of the brightness.
The Gain is a bit more complicated to influence. For the broadband filters it will be determined by the target imaged and Lights are typically recorded using Gain 0 or 100. In order to match HCG-mode, Flats should be recorded at these same Gain settings as well. For narrowband filters, Gain has more flexibility, as Lights will be standard at Gain 100. For Flats the gain can then be increased to 200 or 300 or even higher, something especially useful for the dimmer EL panels.
Ideally the exposure times are similar between filters so that Flat-Darks can be used for calibration (see part three of this series). But for panels without brightness control, this is impossible. So each of the panels may require a somewhat different approach to calibration.
Flats are usually ‘free’ to take, as they normally do not take up any observation time. But in a non-permanent setup, you take them often, so the overall duration matters. Based on the numbers above, one can make an estimate how long a total Flat run would take for a given night. Assuming LRGBHOS filters, stacks of 25 Flats for each filter and 1s download time between frames, these estimates are as follows:
Aurora: 7 min 25 sec
FlatMaster: 10 min 12 sec
FlipFlat: 15 min 37 sec
LightPad: 10 min 25 sec
While the difference between the longest and the shortest is a factor of two, probably the overall required time will not be a limitation for most.
Uniformity
The basis for any Flat frame is an evenly lit light source. A Flat frame is supposed to correct any non-uniformity in the light signal. If the panel itself is not uniform, it will not only reduce non-uniformity from the optical train, it will also add non-uniformity from the panel. Without advanced equipment it is difficult to measure such non-uniformity from a single panel. But since we have four panels here in comparison, we can get some sort of approximation of the uniformity relative to each other.
The experiment was quite simple. With the same filter (Luminance) and Gain (0) setting, series of 10 flats were created with each of the panels. Each of these series was stacked without calibration. Then the flat-frames were subtracted from each other (with a small pedestal to avoid clipping) in each possible combination. This subtraction eliminates all the non-uniformity of the optical train and the result is the combined (non)uniformity of each pair of panels. The following image shows this matrix. Note that the effects are somewhat exaggerated of course, because the images are strongly stretched.
Combinations of Flat panel stacks subtracted from each other on a pair by pair basis. In the resulting image the non-uniformities from the optical train are evened out and what is left are any non-uniformities between the brightness distribution of the individual panels.
First of all, all images from the FlatMaster show the banding as reported earlier. Since this is a stack of 10, the effect is quite strong. But even without the banding, some non-uniformity is visible in all images. The strongest non-uniformity however is visible in the LightPad images. Whatever the combination is, all images show severe blotches, and even more worrying, some of the optical train non-uniformities (dust bunnies etc) seem to come through. In a first test this phenomenon was very strong which I related to a possible slight misalignment of the filter between sessions. But in the second test, the filter was not moved at all and all four panels were tested under identical circumstances. It is guessing what is going on here, but possibly the light beam coming in is not a perfectly parallel light beam, but a mix of somewhat unevenly distributed light beam. From what I understand, such LED panels typically have the LEDs around the edges, with the light being led through diffuser panels. Could it be that putting a rectangular panel on a round telescope may not be an ideal geometry, leading to this effect?
The two panels that perform by far the best in this test are the FlipFlat and the Aurora. They show the cleanest overall image, with only an ever so slight rectangle of non-uniformity in the top left. Looking at the individual stacks suggests that this is in the FlipFlat, but again, a very small and negligible effect.
Color Balance
The light source of a Flat panel is supposed to provide white light. But the brightness of a panel is never exactly equal over the whole color spectrum. And also sensitivity of the camera sensor is not the same for each wavelength. Combined this means that signals in the red spectrum are often then in green/blue. So that is not good news for the two narrowband wavelengths H-alpha and SII which are in the far-red end of the spectrum. Therefore typically H-alpha and SII flat exposures are much longer than for example OIII. At the end of the day, for a monochrome camera it probably does not make too much of a difference how ‘white’ a panel is. As long as all wavelengths can be photographed with enough sensitivity, it’s probably allright. But still it is good to know the behaviour of your panel so that you can take this into account when making decisions about exposure times.
The first experiment that was performed was to take simple photographs of the illuminated field of each panel using a regular mirrorless photo camera. White balance of camera was fixed at 5000K, an approximation of regular (white) daylight. Using a 90mm lens on a full-frame body, the focus was set to infinity while the camera was held approximately 20cm above the light panel. This meant that the image was taken maximally out of focus, thus creating a very diffused image. Below are the four histograms from the HistogramTransformation tool in PixInsight without any manipulation applied.

Histograms of each of the four Flat panels. The FlipFlat appears the most colour neutral, while the LightPad has an excessive shift towards blue.
It is clear that all panels lean towards the blue end of the spectrum with red consistently on the lower end. The FlipFlat seems to be the most neutral panel, with all three colours close together. The one outlier here was the LightPad. This had a very distinct blue-shift. It is possible that this blue-shift is exaggerated due to the use of the A4 sheets. A proper neutral density filter or diffuser panels would probably have been a better choice here.
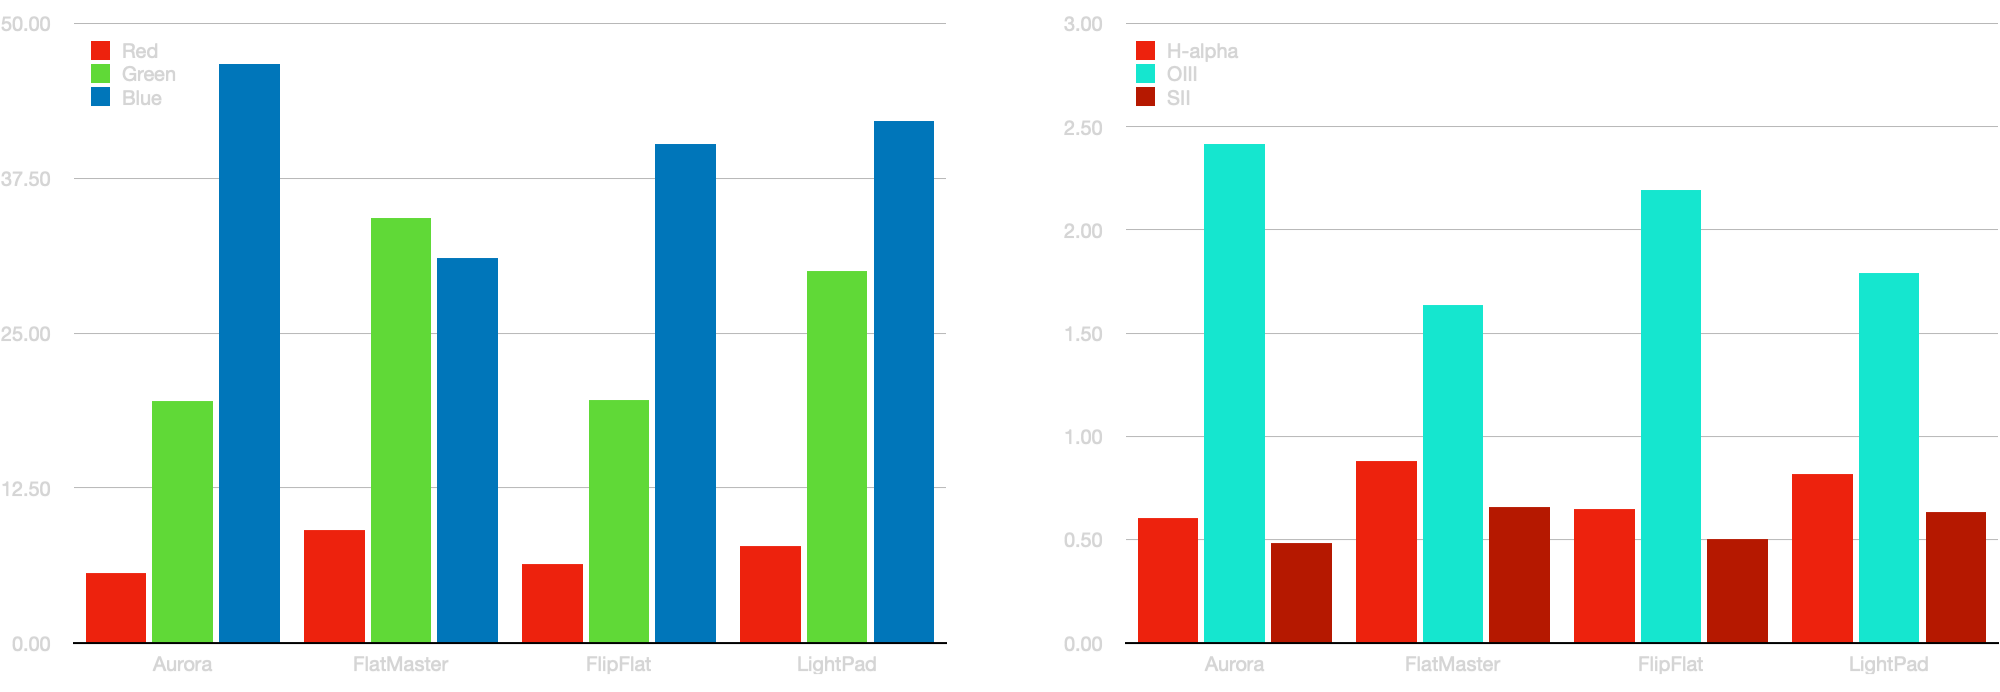
Relative illumination for each filter with luminance set at 100%
A more relevant analysis is the relative response in each colour channel. The experiment was conducted as follows. For each panel, the luminance exposure time was adjusted to achieve an almost maximum illumination (around 62,000 ADU). Then using the same exposure settings, the ADU values of each individual filter were recorded and normalized to luminance being 100%. The results are presented in the graph above.
It is clear that for all panels the Red light is by far the lowest signal. Values vary between around 5 and 10%. The EL panels performed worse here with LED panels being up to 60% brighter. Also the exposures through the green filters were lower with the EL panels than the LED panels. Narrowband filters, by their nature, only pass on very little signal overall. Even the strongest narrowband signal was less than 2.5% of the Luminance signal. Also here we see the LED panels performing better than the EL panels, but the difference is smaller. The largest effect is 47% for the H-alpha filter and for the even deeper red SII line the maximum difference had reduced to 37%.
Conclusion
When I started these experiments, the expectation was that a Flatpanel choice would be made based on convenience and functionality. Things like brightness, brightness control, the ability to adjust brightness in software etc. all seemed most relevant. But this was assuming that the quality of a final Flat frame would be more or less the same for each panel. The surprising result was that the quality of the actual panels varied quite a bit, and that a consistent and uniform light source would be the most important. Most other aspects can be adjusted somehow.
The FlatMaster stood out in a negative way. The serious banding make it a risky panel to use. A Flat frame is used to eliminate artefacts, and even a small risk of introducing a new one is probably not worth it. Despite it being a very practical panel to use. It sticks nicely on the scope, it is plenty bright enough, and software based brightness control can keep the exposures similar in length, making Flat-Darks easier to make. To use the FlatMaster it would probably be good to experiment with different brightness profiles and add neutral density filters to increase the overall exposure time.
The LightPad seemed like a very attractive alternative. Many people have reported positive experiences with them. It is super cheap compared to the other options. But it certainly is too bright for most situations, so the light needs to be diffused. If using this option, finding a more colour neutral diffuser would probably be the right thing to do. But the thing that worries me is it’s non-uniformity, even to the point that the dust bunnies are corrected differently than all the other panels.
The FlipFlat has been my go-to solution for many years. Originally selected because of the potential to automate its use. Just add a series of flat frames at the end of a night’s worth of imaging and the panel closes, turns on and flats are ready when you wake up in the morning. And these experiments have demonstrated that it is actually a very good and versatile Flat panel with a very clean and uniform signal and software-based brightness adjustments. Objectively it is probably the best Flat panel of the four. However the sensitivity towards wind is complicating things. And as soon as you have to take it off in the evening, the scope gets out of balance, and eventually it is more hassle than it’s worth. This panel is probably best suited for fixed observatory-based setups and of course a no-brainer for remote observatories.
The Aurora Flatfield panel probably came out very well in this test. It is a very minimalistic panel, with a fiddly small connector to the inverter. But it does exactly what it is supposed to do, sufficiently bright and for faster scopes can be dimmed using foils. The signal coming of it is very clean, consistent and uniform. The only real disadvantage is that the brightness can not be adjusted, so you will be stuck with a range of quite varying exposure times. In the first article we have seen that higher Gain settings for e.g. narrowband filters can be used without too much penalty, which helps compensate for the lack of brightness control.
The new telescope that will arrive in a few months will have an aperture of 350mm, so a large Flat panel is required. Of the tested panels here, the FlatMaster is not even available in that size. The LightPad would be attractive from a price-point, but results shown here are less encouraging. An Alnitak flatpanel large enough to cover this scope is only the panel without the motor. But it is almost 4 times as expensive as a similarly sized Aurora panel. Based on the results here, the Aurora is probably going to be the best choice for this situation.