
Choosing a Solar Imaging setup

Inspired by observing a partial solar eclipse through a dedicated H-alpha telescope, I decided to add a solar imaging rig to the observatory. But photographing the sun is quite different from deep sky imaging. It requires special equipment, follows different concepts and embraces a unique set of success factors. This was overwhelming and required quite some research. This blog-post summarizes some of the main learning points, which may hopefully help others who want to dip their toes into solar imaging.
Photosphere, Chromosphere, Corona
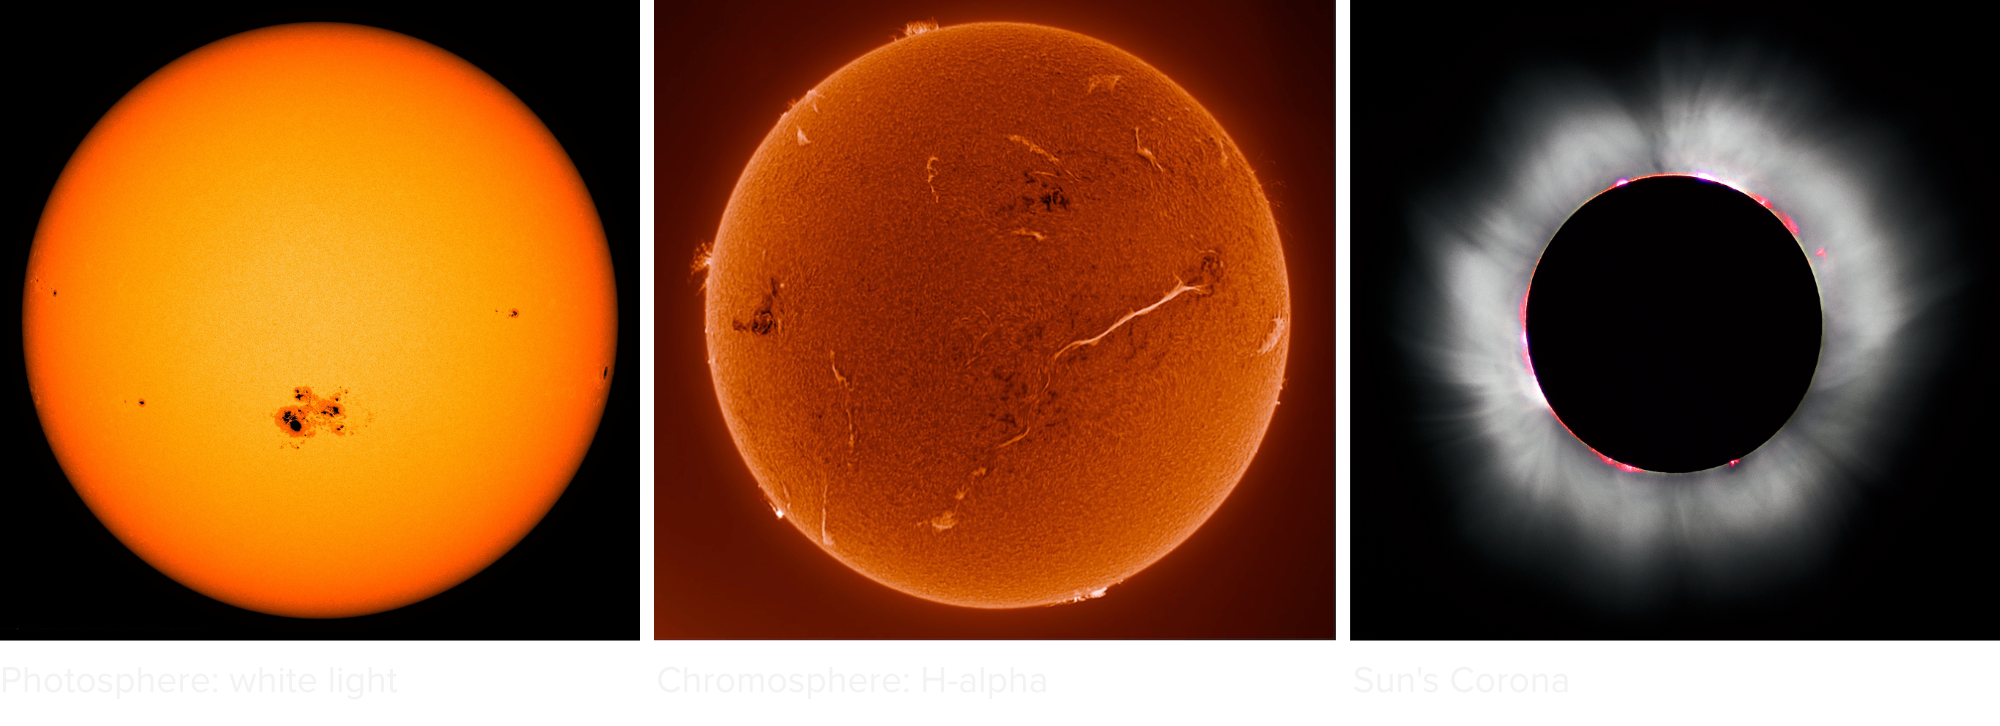
When choosing a solar imaging setup, the first question to answer is what to photograph. Different layers of the sun’s surface show very different features.
By far the brightest layer is the photosphere. This is where the white light is emitted that we experience on Earth as sunshine. Features in this layer include sunspots and sunflares. On top of the photosphere is the Chromosphere. Much dimmer than the photosphere, but with lots of exciting structure. Spicules and fibrils are bursts of hot gas and plasma that rise off from the surface and sink back into the sun, all in a matter of minutes. Filaments (prominences seen head-on, on the surface) are large clouds of gas hanging over the sun’s surface. The chromosphere is a spectacular show of solar activity. The chromosphere emits light at very specific emission-lines, most prominently the H-alpha line.
On top of the chromosphere is the corona, an even dimmer area, but with extremely hot plasma. Structure in the corona can only be photographed if light from the sun-disc is blocked, for example during a solar eclipse.
Stay safe!
The light of the sun is extremely bright and under no circumstances should the sun be observed without proper filters. Severe damage to the eyes will occur! Also cameras should never be pointed directly at the sun through a telescope without proper filters, as the sensor will instantly fry. So under all circumstances, ensure that proper filters are in place.
There are different types of filters, and each will be specific to either the photosphere or the chromosphere.
Photographing the photosphere
The photosphere is emitting broad-spectrum white light. A simple filter is a special sun filter-foil that is placed in front of any telescope (refractor/reflector). The Baader solar filters are very popular due to their high quality and low price. Glass filters are often much more expensive without giving much improvement in quality.
For smaller telescopes, with aperture up to approximately 100mm, an alternative is to place a filter at the back of the telescope, in the form of a Herschell wedge. Only a small portion of the light is reflected in the prism. Together with proper neutral density filters the brightness is sufficiently reduced to observe or photograph.
If you already have a telescope, adding either the foil or the wedge is a quick and relatively cheap way to photograph sunspots and observe/image the sun, eclipses, etc..
Photographing the chromosphere
The chromosphere is best imaged in the H-alpha emission wavelength. The challenge is that the underlying photosphere completely overpowers the signal from the chromosphere. The solution is to image as precise as possible in the H-alpha wavelength. The concept is similar to using narrowband filters when the full moon is out. But ‘narrow’ in the case of solar imaging means a few tenths of an Ångstrom. That is about 100 times narrower than regular ‘narrowband’ filters, which are typically in the 3-9 nm range.
There are dedicated H-alpha telescopes designed for this purpose. But a regular telescope can also be converted to an H-alpha scope.
Etalon
At the heart of every H-alpha telescope is the etalon. An etalon is a combination of two parallel glass plates with a gap between them. When light passes through the plates, some of it bounces between the two plates and comes out with a very slight delay. This causes an interference pattern and light with a continuous spectrum is now split into a discrete spectrum with a series of light peaks (see the schematic below). The wavelength of these peaks can be changed in one of three ways:
* by slightly tilting the plates relative to each other (tilt-tuning)
* by increasing the pressure between the two plates (pressure-tuning)
* by heating a mica-spacer between the two plates
Etalons are very expensive to make. For the filtering effect to work well, the glass needs to be polished to much stricter specifications than regular optics. This makes the price go up exponentially with size. Etalons can be placed at the front, in the middle or at the back of the telescope. The more they are to the front, the bigger they need to be for a given aperture, and the more expensive they are. Tilt-tuned etalons are typically placed at the front of the telescope and should be quite large. Pressure-tuned etalons are often in the middle, which allows them to be smaller and therefore cheaper. Mica-spaced etalons are placed near the camera so are very small. Some of these solutions are very price-competitive. But as the etalon is placed further towards the back, design limitations are introduced. The solar disc may not be illuminated evenly, and towards the edges of the frame the filter may get a bit off-band. This introduces a so-called sweet-spot and makes it harder to get an image that is evenly lit, and contrast-rich into the edges. But in the end this is theory. The biggest effect on quality is the manufacturing tolerances, more so than the type or size. A small very good etalon may very well outperform a large ok-ish etalon.
Blocking filter
The light that passes the etalon is now split into a series of discrete, narrow bandwidths. Next in the optical path is a blocking filter, that is selective for the bandwidth around the H-alpha emission line. The blocking filter does not need an extremely narrow bandpass (which would be impossible), it just needs to be narrow enough to eliminate the adjacent bands. Still the requirements are a lot more stringent than filters used in narrow-band deepsky imaging, which makes them more expensive. Blocking filters are always placed just in front of the camera. This means that its diameter determines how much of the sun’s surface for a given combination of focal length and sensorsize can be photographed. Blocking filters are quite expensive and price goes up with size. Therefore they are offered in various diameters to best fit the scope/camera combination used.
An etalon changes light with a continuous spectrum into a discontinuous spectrum with discrete wavelengths. The blocking filter right in front of the camera selects the peak with the correct bandwidth.
Double stacking
One method to further narrow the bandwidth of the light passing the filter is stacking a second etalon on top of the first. This is called double stacking. The smaller bandwidth makes it possible to further isolate the chromosphere from the photosphere, leading to more contrast-rich images. See here for an example. Also the edges of the sun, which in a single stacked setup can be quite bright, is much more evenly lit with the rest of the surface.
By double stacking, the second etalon reduces the width of the individual peaks even further, for maximum detail.
Aperture
In deep sky imaging, aperture is primarily used to collect as much as possible light. Bigger scopes can collect more light of fainter objects. With the sun, there is no shortage of light and aperture plays a different role. Imaging the sun is done using ‘lucky imaging’ (see below under ‘Cameras’). This means that the theoretical resolution of the telescope will play a big role in the detail we can measure. And this theoretical resolution is determined by the aperture. The bigger the aperture, the higher the resolution. But atmospheric conditions such as turbulance, smog, thermals, etc. will make you less ‘lucky’ during imaging. As a general rule of thumb, going anything wider than 80mm has no benefits in areas with average atmospheric conditions. And apertures of 40, 50 or 60mm can create beautiful images.
Alternatively one can go with as big as an aperture as budget allows, and stop down by adding a diaphragm, if atmospheric conditions so dictate.

A diaphragm is an easy way to change the telescope’s aperture. This version has a variable opening for maximum flexibility.
Cameras
For solar imaging of both photosphere and chromosphere, best is to use a monochrome camera. The yellowish colour often seen in sun images is added during post processing. For example, changing the midtone sliders in the Levels Adjustment tool in Photoshop to 1.6 Red, 0.8 Green and 0.2 Blue will create a nice warm sun-colour.
Imaging is done by taking as many as possible images, and keep the best ones. ‘Best’ means a short moment of stable atmosphere frozen in time, typically milliseconds. This type of imaging is known as ‘lucky imaging’. Usually frames are captured by recording in video-format. A camera that can sustain high frame-rates is important. Some cameras however can go very fast. The ZWO ASI174MM for example has a maximum frame-rate of 128 frames/s and is therefore often used for solar and/or lunar/planetary imaging. But also frame-rates of 40-60 frames/s is fast enough. Depending on the telescope camera combination, the captured area may be much smaller than the maximum size of the sensor. And capturing these smaller Regions of Interest typically have much faster frame rates.
Another important criterium for camera selection is the pixel-size. As a general rule of thumb, the optimal sampling is the maximal resolving power of the telescope divided by 3.5. In lucky imaging conditions, the resolving power of the telescope is its theoretical resolution, also known as ‘Dawes’ limit’. For the H-alpha line, the Dawes limit is 136.8/D (D=aperture in mm). So a 60mm telescope has a theoretical resolution of 136.8/60 = 2.28 arcsec. Optimal image sampling is then 2.28/3.5 = 0.65 arcsec/pixel.
The image sampling of a camera is calculated as 206*pixel-size/focallength. To achieve an image sampling of 0.65 for a 1000mm focal length, the pixel-size should be 3.15 micron.
So in the end, optimal sampling is determined by aperture, focal length, and pixel-size. That is why sometimes people refer to a good match between camera x with a focal ratio y. But even when an existing system is not an ideal match, this can sometimes be made to match. Aperture can be reduced by adding a diaphragm on the scope, and focal length can be adjusted using barlow lenses.
Finally sensor size is important as well. Together with focal length, this will determine whether you will be able to see a full disc, or only a portion of the sun.
Market offerings
There are so many variables, that it is often difficult to decide what to choose. Photographing the photosphere is probably the easiest. Simply adding a foil solar filter to an existing scope would be sufficient for many. Photographing the chromosphere in H-alpha is a different topic, but also here are some off-the-shelf solutions available, most do not come cheap.
Mica-spaced etalons
Probably the best known solution in this category are the Daystar Quark filters. They are relatively affordable and can be added in the eye-piece holders of existing telescopes. Some very good results have been obtained with these filters. One thing to remember is that because of the construction of a mica-spaced etalon, it requires a so-called telecentric barlow. This barlow is integrated in the Quark filters and gives a magnification of 4.2x. The good news is that this allows for some nice close-ups of the solar surface. The bad news is that with most telescopes it is difficult to get a full-disc image. Adding a 0.5x barlow between Quark and camera can help, but adds more optical elements which will not improve the final image.
Higher quality and significantly more expensive mica-spaced etalons can be found in the Daystar Quantum series and the extensive range of high end filters produced by Solar Spectrum.
For telescopes up to about 100mm aperture, these etalons can typically be placed in the eyepiece holder without any further light reduction in the telescope itself. In the optical path, the concentration of light and the build-up of heat is fairly limited and optics and mechanical construction can handle it well. For telescopes with a larger aperture, it is important to add a light reduction filter in front of the main objective.
All-in-one H-alpha telescope
A few companies have developed all-in-one dedicated H-alpha telescopes. In particular the telescopes from Lunt, Coronado and Solarscope fall in this category. Their benefit is that filter types and sizes, focal ratios, etc. are all well matched. Also many of these telescopes can be upgraded over time, by double-stacking, bigger blocking filters, better focusers, or filters for different wavelengths (e.g. Calcium). Some of them can also be converted to regular telescopes for deep sky imaging, so could theoretically be applied for dual purpose. However, they are optimized for solar imaging and as regular telescopes they are probably easily matched by relatively affordable alternatives in the market.

Do-it-yourself rig
All three companies that produce dedicated H-alpha scopes, also make separate etalons that can be front-mounted on general telescopes. This creates a lot of flexibility to assemble one’s own system based on personal preferences for each individual component. This flexibility comes at a cost though, as the large front-mounted separate etalons are usually more expensive than their counterparts in all-in-one systems.
So what’s the choice?
As I started this blog, the original purpose was to add solar imaging capability to the observatory. A lot of research went into this, and led to the above-mentioned insights. I finally decided to go for a ‘do-it-yourself’ solution.
A double-stacked 60mm solar filter from Solarscope (DSF-60) forms the basis of the setup. The optical quality of Solarscope is heralded by many in this field. While 60mm is a bit smaller than originally planned, the incremental quality of a larger size would probably not weigh up against the extra cost under my sub-optimal atmospheric conditions. The filters come with matching 20mm blocking filters, more than sufficient for full-disc imaging. The filters will come with two adapters. One to attach to the FSQ-106, and one to attach to a newly purchased Takahashi FOA-60Q. This is a new very portable telescope of high optical quality that can also be used for regular observations (both visual and imaging), especially during travel.
As camera the plan is to use the ZWO ASI533MM Pro for the time being. This was purchased as a replacement for the ASI1600MM Pro for Deep Sky Imaging. It is decent-fast, and the pixel-size of 3.78 micron is a reasonable fit for the FOA-60Q.
The etalons are made on order and are currently in production. As soon as they arrive, another period of extensive studying and experimenting will undoubtedly take place. And that is even before developing basic skills for processing these images. At the end of that process, I hope to write a follow-up to this blog with the experiences gathered.
References
In researching the topic of solar imaging, there are two sources that are particularly worth mentioning. First there is the Solarchat forum. This is a forum purely dedicated to anything related to observing the sun. Information on equipment, technical discussions, but also many, many observations and images being shared. The sun is a dynamic object that looks different every day. The forum often shows the latest events very shortly after they take place. Many other astronomy forums have areas dedicated to solar astronomy, but none as detailed as this one.
The second reference worth mentioning here is the book Solar Astronomy. It is considered the standard reference on anything related to sun observations. Written by a whole team of long-term experts in the field, it provides an enormous amount of detail. Sometimes the detail can be a bit in the way of understanding the bigger picture, but nevertheless, this is definitely worth checking out if you’re interested in observing the closest star to earth.