
Messier Marathon
Observing all 110 Messier objects in one night is called a ‘Messier Marathon’. That is quite a challenge, and depending on the latitude of the observer the maximum number of objects may be even a bit lower than that. Photographing all 110 Messier objects is easier on one hand, with automated slews to target, but more challenging because you have to get a decent photo for each target in less than a few minutes. This blog describes an imaging attempt to the Messier Marathon as it was performed on 18 March 2026.
Introduction
The Messier Marathon was first introduced by Don Machholz in 1970. The goal is to observe as many of the Messier objects as possible in one night. He wrote about this in his book The Observing Guide to the Messier Marathon: A Handbook and Atlas. This can be done when you start as soon as the sun sets, and continue all night long until the sun rises again in the morning. With optimal latitude of the observer, and great weather conditions, it is possible to observe all 110 objects. But being further from the ideal latitude or experiencing low clouds on the horizon can quickly reduce how many you can see.
Originally the challenge was designed for visual observers, star hopping their way through the sky. The introduction of GoTo mounts have made this much easier, but real die-hards will still go fully manual. For astrophotographers there is another challenge. During the busiest periods, there is only about 3 minutes time available per object. So you need a fast scope, sensitive camera and still you will only have a few frames to stack.
At our local astronomy club we had decided that we would go for the challenge this year. A diverse group of visual star hoppers, GoTo observers, robotic telescopes and astrophotographers. This blog describes my attempts to photograph as many Messier objects as possible in one night.
Planning and Preparation
A careful planning is crucial. There is limited time and lots of targets. Some targets will be visible for only a short while just after dusk before they set under the horizon. Other targets will rise in the morning only just before dawn. There is an optimal order of objects, but also a time allocation that needs to be worked out. One order of the objects has been provided by Don Machholz in his original publication. Over the years, many people have shared different alternatives. A famous Messier Marathon expert is Jonathan Ward and his video with tips is definitely worth checking out. I typically plan my astrophotography using Astroplanner and in this software is a rich catalogue of User-Contributed plans that can be downloaded. There are a few Messier Marathon plans in there as well and I downloaded the one from Doug Lucas as a starting point. Also in our local astronomy club, some detailed planning took place, in particular regarding proper timing of groups of objects. I eventually put all this info together and created an Astroplanner plan, that largely followed Doug Lucas’ order, and grouped objects in a total of 9 groups, with start and end-times relevant to my observing location (53°N) for March 21, 2026. This was the weekend just three days after new moon. One of the nice aspects of Astroplanner is that it calculates exact positions for any time you tell it to, so I created a list specific for each group of objects with altitudes and azimuths for the start-time of that group. And by carefully judging these altitudes, I assigned optimal time intervals for the 9 groups. The below schedule summarises the plan.
| Group | Time | Objects | time/object |
|---|---|---|---|
| A | 19:55-20:25 | M77 M74 M33 M31 M32 M110 M79 M52 M103 M76 M34 M45 | 3min |
| B | 20:25-21:30 | M42 M43 M78 M41 M93 M47 M46 M50 M48 M1 M35 M37 M36 M38 | 4.5min |
| C | 21:30-23:30 | M44 M67 M95 M96 M105 M65 M66 M81 M82 M97 M108 M109 M40 M106 M94 M63 M51 M101 M102 | 7.5min |
| D | 23:30-02:00 | M53 M64 M3 M98 M99 M100 M85 M84 M86 M87 M89 M90 M91 M88 M58 M59 M60 M49 M61 M104 M68 | 7.9min |
| E | 02:00-03:00 | M83 M5 M13 M92 M57 M56 M29 M39 | 7.5min |
| F | 03:00-04:00 | M27 M71 M12 M10 M14 M107 M9 M4 M80 M11 M26 M19 M16 | 4.6min |
| G | 04:00-04:45 | M17 M18 M24 M25 M23 M21 M20 M8 | 6.4min |
| H | 04:45-05:15 | M62 M28 M22 M15 M2 | 6min |
| I | 05:15- | M6 M72 M73 M75 M69 M7 M54 M70 M55 M30 |
At the start-time of 19:55h, which is 10 minutes before nautical dusk, all targets in group A have still an altitude of >9°, but have to be photographed quickly before they set below the horizon. This is a very time-critical group. All targets in group I have an altitude of <5° at 05:15, which is the start of nautical dawn. While they are rising, there is simply not enough night left to photograph them.
Equipment
Another decision to make is which equipment to use. Many Messier objects are rather small, so a longer focal length would be preferable. On the other hand, the exposure time per object will be very limited, so a fast system of at least < f/5 will be needed to capture enough light to get a decent photograph even with short exposures. Furthermore the location was a remote dark site, so equipment should be portable enough to carry around. I settled on my recently acquired Takahashi FSQ-85. With reducer this becomes a fast 330mm @ f/3.9 system. There would not be enough time to take separate R,G,B frames. Alternatively, one could just do luminance and collect gray-scale images only. While this would collect the most light, the results would also a bit boring. So in the end I decided to use an OSC camera which would not require filter changes and would bring in a bit of colour in the final results. Exposures were kept short so guiding was not required, eliminating a potential source of failure. Many images would be shot at very low altitude where seeing is not always great, which could throw off guiding.
Telescope
Mount
Camera
Filters
Guiding
Accessoires
Software
Takahashi FSQ85, QB 0.73x reducer (320mm @ f/3.9), Astroasis focuser
Rainbow Astro RST-135E, Gitzo GT5533S tripod
QHY268C, cooled to -15 ºC
Astronomik L3, 2” mounted, Baader filter drawer
none
Fitlet3, Linux Mint, Pegasus Saddle Powerbox
KStars/Ekos, INDI, Astroplanner, PixInsight
The location did not have any power outlets, so all equipment had to be powered using batteries. This included the complete rig, but also the laptop and phone. Assuming a 19:00h start and a 06:00h finish this meant 11 hours of power. From most equipment it was known how much power was needed under indoor circumstances. But freezing temperatures can have a devastating effect on battery-life. So I decided to bring not just one, but two GoalZero Yeti 500x Power stations with me. Each has 500Wh of energy available. They can be daisy-chained so if one runs out, the second can just be plugged in, continuing power supply without interrupting any of the imaging. For the laptop and phone I brought two 100Wh power banks. That should be enough to fully recharge the laptop twice if needed. It turned out that I only used about 60% of the Yeti’s combined and the MacBook Pro kept going for most of the night and only had to get some extra juice towards the end of the night.
Imaging
Per object there is only very limited time available to photograph. Group A allows the least time, with only 3 minutes per object. And that is taking into account that some objects can be combined into one photo (e.g. M31/M32M110). Within the three minutes the target needs to be selected, the telescope has to slew to target, plate-solve/align to target, take the photos and download the photos. On top of that you need a bit of slack time for the occasional focus run as temperature changes, or any other little hiccup one might encounter during an imaging schedule. I decided to take 30s images and take more or less frames depending on the time available. That resulted in taking either 4, 5 or 6 subs per object, representing 2, 2.5 or 3 min total exposure per object. To further maximise exposure, the gain was set at 26, which for this QHY268c camera is the High Conversion Gain mode.
Some objects would do well in narrowband. However I decided to just photograph with an UV/IR cut filter (Astronomik L3) in broadband colour. Narrowband typically requires longer exposures and filter changes in these busy schedules would complicate things.
To keep the pace during each of the imaging groups, selecting the next target straight after completing the previous is crucial. Rather than doing this manually, this process was automated using the scheduler in KStars. For each of the groups a schedule was built beforehand. So during the evening I had to load a new schedule for the start of each group.
A stack of 4 images 30s each
A single image of 120s
Targeting multiple short exposures was a technique ‘borrowed’ from EAA. It is used in robotic telescopes such as Dwarf or Seestar and implemented in certain software solutions like Stellarmate/KStars and ASIAir. During a second evening I took some 120s exposures, just for comparison
On the left are examples of 4×30s (left) and a 1x120s (right). The level of detail in the 120s image is higher at the cost of more noise. So perhaps taking 120s or 180s images is better. But it is more risky. If something goes wrong with one frame, the whole object is lost. For very low targets, passing clouds can easily obstruct the target for a short while, so this risk is real.
There is a slight colour difference between images, but that is related to processing, not to capture.
The marathon….
The first plan to do the Messier Marathon within our astronomy club was already made at the start of the winter season. And between then and the middle of March a lot of planning and preparation had taken place. But the big question of course remains: will there be clear skies? We had targeted March 21 as the date to do the marathon, but kept options open to do it earlier or later, depending on weather conditions. During the week before, weather apps indicated that Wednesday March 18 would be a decent opportunity, with Saturday March 21 a second best. But as we got closer to the day, the forecast became worse. Even on the day of the 18th it was still questionable. We decided to give it a go. If it did not work out, it was just a good final rehearsal and we could try a second attempt on the Saturday.
The observation site was our usual spot in Gasteren, a nice dark place (SQM typically around 21.4-21.5) with free sight for almost the full 360°. As we arrived there, the sky was still remarkably clear as it had been for most of the day. We were with the four of us, two visual observers, one with a Dwarf and myself. The equipment was setup, aligned, and we waited until the 19:55h mark. As it got darker, it remained clear and we could all start on time.
I loaded my Group A schedule in KStars and the first image came in at 19:57. As temperature dropped quickly, I had to do an autofocus run about 20 mins into the run and eventually group A was completed by 20:30, five minutes behind schedule. Even very challenging objects like M74 and M77 had been captured. They were tiny, in the midst of clouds and without any discernible detail. In the case of M74 it had even narrowly escaped from a very nearby passing plane. But also these small and faint targets were captured and that’s what counts.
The scheduler in KStars, loaded with all objects from group A. The green dots indicate the planned observation times. Note that all objects are imaged under twilight conditions.
Quickly moving on to group B which was completed right on the dot at 21:30. For each target I had programmed a slew and alignment. This means two exposures + platesolve for each target. Normally I have that exposure set quite long (10s), to make sure I get a good plate solve. But during group B the exposure was shortened to 5s, which helped to get ready in time. With hindsight I could also have eliminated the whole alignment. The field of view of the setup was so large relative to most targets, that just a slew to target would have been sufficient. A learning point for next time.
We had set the rule that any observation, visual or photographic was only valid, if you wrote a few words about the object you had observed. So while the scope was busy slewing across the skies, I took some time to look at the images coming in and made notes. Originally I used the Autostack function in KStars to maximise the image quality. But the small objects in combination with just a handful of frames did not reveal much more detail in the on-the-fly auto stacked version, so I stopped doing that after group B and just reviewed the previews coming in. By 22:30h group C was done. This was the first time that there was some slack in the schedule. That time was used to take the flat frames. In 10 minutes the flats were completed and we were waiting for group D.
By 23:15h group D started. Against all expectations the skies had remained clear. So we went on and slowly started to become hopeful that the whole marathon could actually be completed tonight. Until midnight the conditions were pretty good. Temperature was around 5°C and humidity around 75%. Unfortunately that all changed after midnight. The humidity went up to above 90% and temperature dropped by a few degrees to just over freezing. Everything got wet now and in general it was a lot less comfortable. After completing group D by 00:30h, the other people went home and I was wondering what was the best thing to do. The sky was still clear, perhaps not the most ideal conditions, but clear enough to keep going. It was just getting less comfortable. I decided to stick around and give it a go until the end.
The office for the night…
Group E was not scheduled to start until 02:00h, so there was quite some gap-time. I used that to start walking around, trying to help keeping myself warm. The consumption of some hot drinks and snacks helped to pass time and stay comfortable. When Group E started, it felt a bit like a routine. The sky was still clear and the end got in sight. By 2:38h I had photographed 74 targets, pretty much three quarters on the way.
Group F went well from 03:00h until 03:45h. But temperature had dropped further and it was now actually freezing. I kept myself wrapped in a blanket as much as possible to stay warm. But slowly and steadily it became more and more uncomfortable. It was now that moment where you realise you’re too far in to give up, but realise that you still have two hours to go, which will not be very comfortable.
By 04:00h group G was started and this set of 8 targets was completed by 04:23h. Only an hour left.
Group H was started by 04:45h. Not the most ideal targets anymore, and it was now freezing -2°C. M2 was just not visible in a murky backdrop of low hanging clouds. Would the counter get stuck at 99 images?
Group I was a kind of a rest group. The nights at this latitude are just too short for these targets to rise sufficiently above the horizon to photograph. I started at 05:15 when it was slowly getting lighter. By surprise I was able to capture M6, my 100th target! Stimulated by this success I went on with attempts for M72, M73 and M75, but none of these were visible in any of the frames shot. So at 05:23h I stopped the schedule and happily closed down the computer with photographs of 100 objects stored in it.
I started to pack things in. Everything was cold and wet and my hands and feet were freezing. But it did not matter as I had photographed 100 objects, probably the maximum achievable from this location. It now became light very quickly, the birds started singing at once and I drove home to try to catch some sleep.
On Saturday March 21 the forecasts were again not super, but we tried again anyway. However this time conditions were worse. It was more humid, colder and seeing conditions were generally worse. While I already had achieved my goal, I joined the group again. I took the opportunity to try out some different things. One was to image with longer focal length (flattener instead of reducer), and using longer exposures. But the conditions were not great and by around 23:00h everyone had decided to give up and we all drove home.
Processing
At the end of the night, there were well over 500 frames divided over 100 targets ready for processing. This in itself is a marathon. WBPP can only work with one reference frame, so the pre-processing had to be done with a single run of WBPP per target. And for processing I tried to automate the process by using image and/or process containers, but this did not work very well. From time to time the process got stuck on something and required manual intervention anyway. Also I noticed that even though conditions were roughly the same between images, each image required its own tweaks during processing, rather than a one-size-fits-all approach. So yes, 100 individual objects for which 4-6 images needed to be processed into a final jpeg the manual way. What made processing easier was that the targets were typically a heavy crop from the original capture. This makes every process to go much faster. Also there was no pressure to get the maximum amount of detail out of each image, since this simply wasn’t there. So no need to tweak multiple runs of GHS to pull out just that little bit of nebulosity a bit better, or an iterative application of LocalHistogramEqualisation to pull out a little extra detail from the core.
I developed a standard set of process icons that gave sufficient flexibility to process most images. And just applying them one after the other made the process per image relatively quick. Still with something like stretching, individual adjustments were often necessary. The new MultiscaleAdaptiveStretch (MAS) turned out to be very practical. Just enough sliders to adjust when needed, while still keeping it simple enough to keep it a one-click process. Colour calibration was sometimes challenging. In principle SPCC was applied, but on such small crops this did not always make sense, or there were simply not enough stars to work. In such cases, regular ColorCalibration was used. BlurXTerminator was used in an absolute minimal setting. The pixel scale of my setup (2.4”/px) was too high for the sharpening to have some meaningful effect, and too much star reduction simply meant that stars almost disappeared with this pixel scale. So it was more a star correction tool, which was quite useful for some of the unguided images. NoiseXTerminator did a lot of heavy lifting. A stack of 4 very short exposure frames just inherently holds a lot of noise when stretched to anything decent.
TIP: One thing to note is that PixInsight requires a minimum of three images to integrate. It cannot integrate two images. For my situation this was ok, as I had 4, 5 or 6 images to work with. But if you would have taken for example 2×120s, this would simply not integrate. I’m sure you can do something with PixelMath, but this is something to keep in mind.
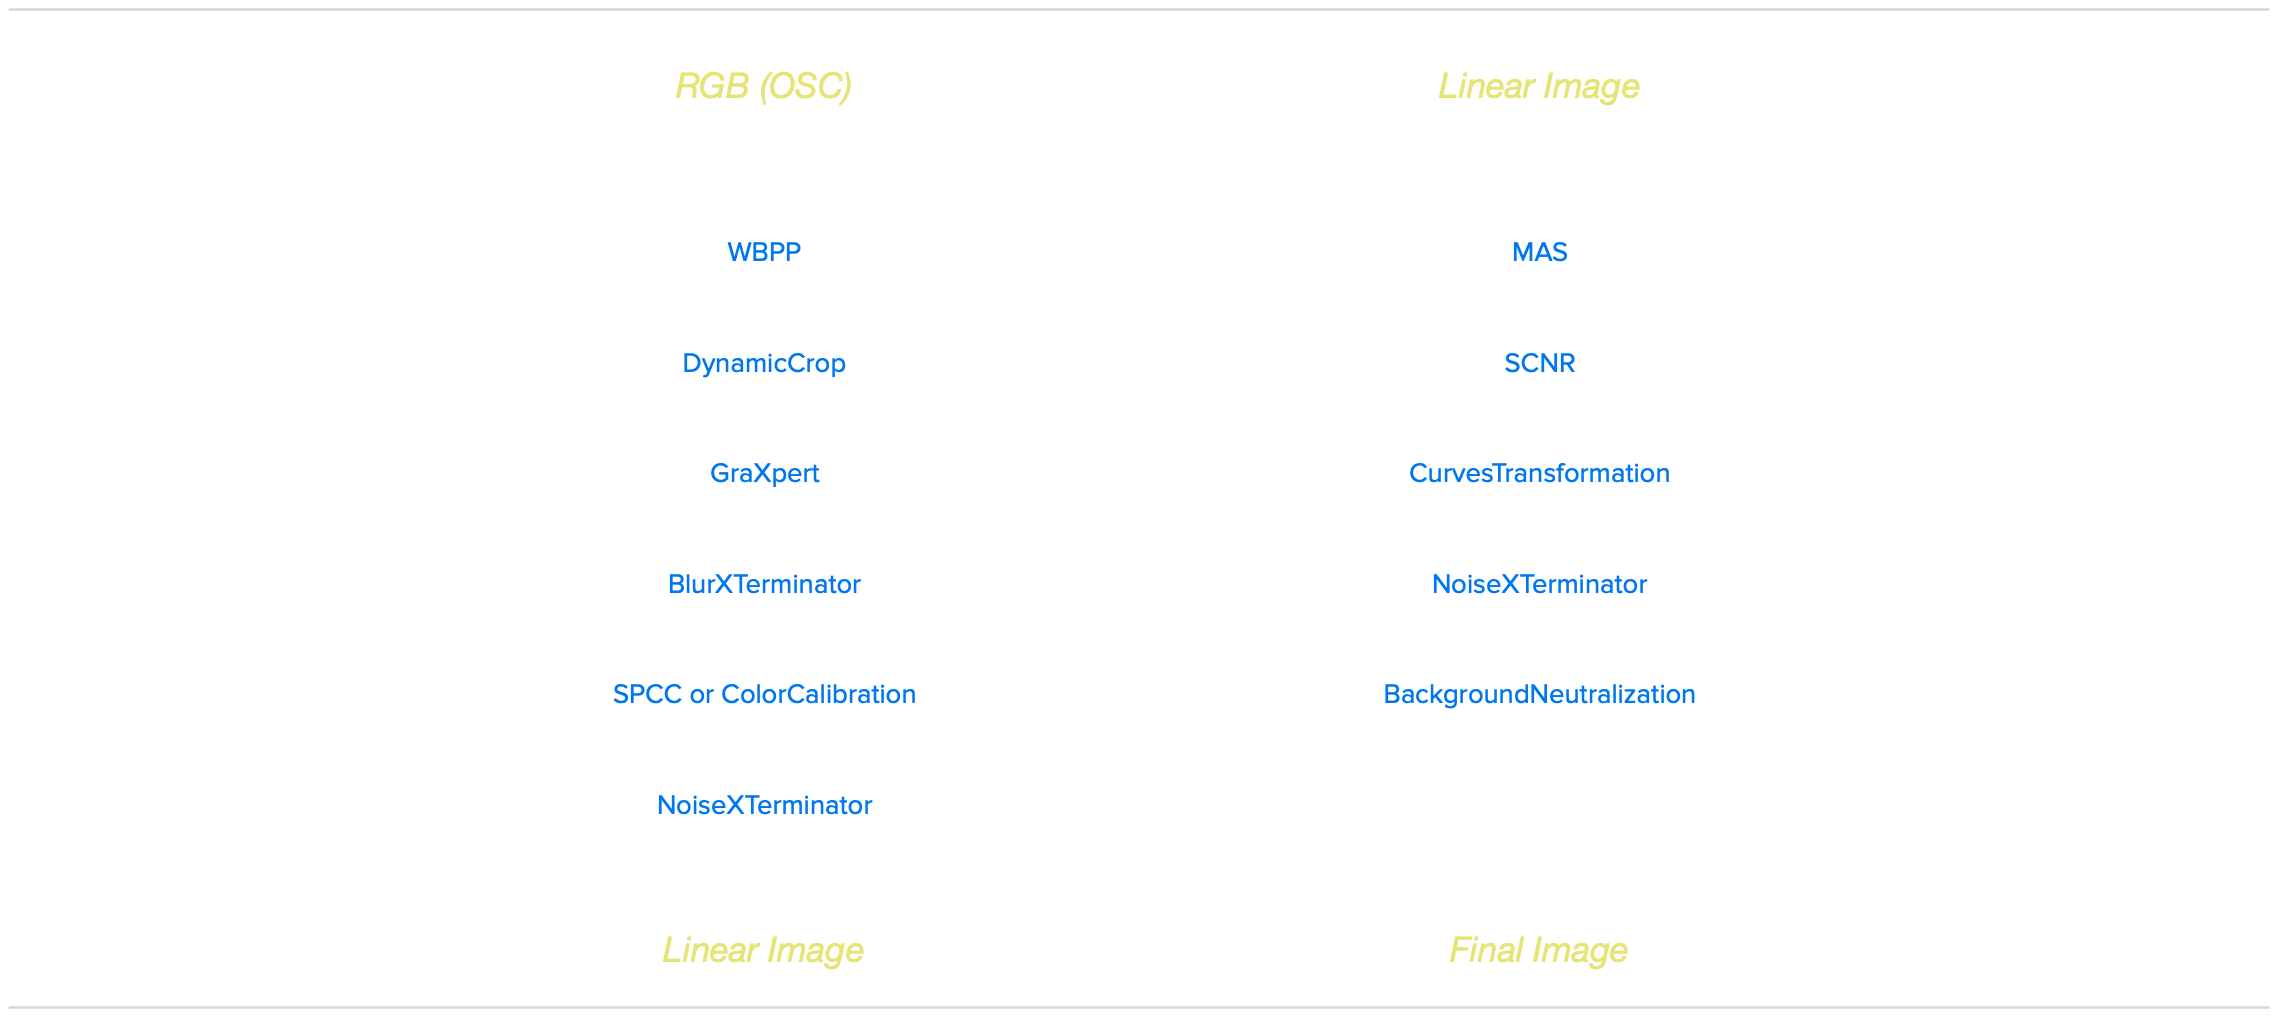
The general process flow applied to all images. Occasionally alternative tools and/or additional steps were applied if the image so required.
Results
The result of all this was a set of 100 images of the total 110 Messier objects. A collage was produced using Affinity and is shown at the top of this page. As the targets all have very different sizes, the crops were limited to one of the following four dimensions: 15’x15’, 30’x30’, 1°x1° and 1.5°x1.5°. The dimensions are added to the collage so that the viewer has an impression on the virtual size of the object. While the collage gives a good overview, if you want to see the individual images, it is better to take a look at the full resolution version.
To be honest, the image quality turned out much better than I had expected. For most of the targets, there is a fair amount of detail visible. Only M74, M77 and M83 were nothing more than a small faint nebulous object. The rest of the objects were looking pretty well. Also the traditional narrowband targets came out well in full colour RGB.
A comparison of five targets imaged using the FSQ-85 with reducer (330mm @ f/3.9) and with flattener (450mm @ f/5.3). The latter gives better resolution, but the difference is not huge, and the slower version had more difficulties with a faint target like M33.
On Saturday the 21st I took images using the FSQ-85 with flattener instead of the reducer. This makes it a 450mm f/5.3 telescope. Slower, but with more resolution. The conditions were worse on the 21st than on the 18th, so a direct comparison is difficult. But the extra resolution definitely helped to bring out more detail. See the image above for a direct comparison for five different targets. It was not a night and day difference, and the slower scope had more difficulties with a faint object like M33. In conclusion, I found that the fast wide-field version yielded remarkably good results for the purpose. After all the intent was not to get the best images, but get many. While a telescope with a focal length in the range of 500-1000mm would be better suited for the targets, I would only use that if it would be sufficiently fast, say f/5 or faster.
Conclusion
Doing the Messier Marathon was absolutely a lot of fun. The long preparation, puzzling the best allocation of targets over the night, and the constant weather watch during that last week all was a nice lead into the event itself. It is nice to do this with fellow amateur astronomers. For everyone this was a different challenge. For visual observers without GoTo the star hopping is quite the challenge. For a user with a robotic scope it is a nice test to see how much can be done with such a small and smart package. And for astrophotographers like myself pushing to photograph more objects in one night than many people would do in a full year and make them look somewhat decent is very rewarding.
In the end I ‘scored’ 100 out of the 110 objects. That is pretty much as good as it gets from where I live, so I’m very happy with it. If I would ever do this again, it would be great to do this from a latitude where you could theoretically do all the 110 objects. Somewhere in the south of France or Spain would probably work. Other than that, there is not much I would change at all.
So for anyone who is looking for some fun and a bit of a different challenge, I can highly recommend doing a Messier Marathon. As such, hopefully this blog can be an inspiration for others as well.
Resources
Anyone who would like to do a Messier Marathon themselves might find the following resources helpful.


The full list of targets in order of observation and separated out in groups. Owners of Astroplanner can download the complete observation plan as a user-contributed plan in Astroplanner. Just search for ‘AWC’. This list is designed for observation on 21 March 2026 at the location Gasteren, The Netherlands. Timing of the groups needs to be adjusted for different dates and/or locations.
Users of Astroplanner might find this print settings file convenient. This file can be loaded when printing the document, resulting in the layout of the pdf file referenced above. Mac users can also use this print method to save as PDF.
A set of 8 KStars Scheduler files. Please note that for this to work on your own system, that for all instances where the optical train or the sequence file are referenced, this needs to be changed to the applicable names. KStars scheduler files are regular text files, so a search/replace with any text editor should work.