
Total Solar Eclipse Spain - The Journey
If there is one astronomical event that impresses both astronomy enthusiasts and almost everyone else, it is a total solar eclipse. Regardless observation conditions, the fact that daylight simply switches off for a moment has a profound effect on anyone experiencing it. In contrast to partial solar eclipses, total solar eclipses are less common. And if they happen, the path of totality is often limited to a small geographical location. On the European continent, the last total solar eclipse was visible in 1999, which I observed from Germany. On 12 August of this year a total solar eclipse was visible across the northern part of Spain. And a long time ago already, the plan had been made to observe this eclipse. This time the goal was to do some serious photography as well.
Preparation
For a successful observation of a solar eclipse, a proper preparation is crucial. This includes finding a right location, searching a proper observation spot, deciding on the type of images to shoot, select the appropriate photography gear for such images, and practising the shooting sequence.
Finding an optimal location was done with the help of the Solar Eclipse Guide Spain and Solar Eclipse Atlas 2026/2027/2028 from Oculum Verlag. There are three main points to consider: proximity to the path of totality, statistical weather forecasts and timing of the eclipse. While the path of totality did cross the tip of Iceland, that country quickly dropped out because of statistically bad weather conditions. As can be seen from the image below, the path of totality crosses the northern part of Spain and even covers the balearic islands. However, the eclipse happened at the end of the day, with lower altitude of totality moving eastward. On Mallorca totality would be at an altitude of 2°, making it very susceptible to even the lowest hanging clouds over the horizon. It would make for a great image to see the eclipse sink into the sea, but risky. Probably the best location would be the coastline of Galicia and Asturias, with maximum altitude of totality and complete free visibility to the west. However, with the Cantabrian mountains just behind the coastline, it is also an area with lots of rain and clouds. In fact, it is one of the wettest parts of Spain. We decided to stay just behind the Cantabrian mountains, with the option to travel into the mountains for some dramatic backdrops in the case of good weather forecasts. But also an easy escape to the Castilian plateau if weather forecasts were not so great. The Castilian plateau is a flat and dry area with statistically the most clear skies. It stretches from the foot of the mountains almost all the way to Madrid. We ended up finding a hotel in Pandorado, just 40 mins north-west of Léon, a perfect place to go either way, depending on weather conditions.
The path of totality across the northern part of Spain. The north-west is a much wetter region, but has beautiful mountains as the decor. Further to the east conditions may get better, but the eclipse will happen much lower on the horizon. The pin shows Pandorado, the place where we stayed.
Equipment
For close-up images of the sun, showing Bailey’s beads, diamond ring and corona, a Fujifilm GFX100II camera was used with the GF500mm f/5.6 lens in combination with the 1.4x extender. This results in a 700mm focal length. But to compare this medium format camera with regular full frame cameras, a 0.8x crop should be applied. So this setup equals a 560mm telelens on a regular full frame body. The benefits of this combination are easy focusing using the autofocus function, a 100MP resolution sensor, so plenty of detail, and a 9-stops bracketing option, ideal for quickly changing conditions around start and end of totality. While I did consider bringing a light travel telescope, such as the FOA-60Q, which is part of my H-alpha solar setup, I decided not to. Focusing would have to be done manually, and for the astrocamera I’d have to connect it all to a laptop, which would make the overall setup just a lot more complicated. I did some testing with the GFX100II and the results were very good, so that seemed like the perfect choice.
The rig would be placed on a Rainbow Astro RST-135E equatorial mount for tracking. A tracking mount is not strictly necessary for the shutter speeds used. But it provides so much peace of mind not to constantly have to manually re-center the sun. And at 3.5kg, this mount is perfectly portable and could well be transported even in the checked-in luggage.
For the wide-field images of the sun, a Leica SL3-P full frame mirrorless camera was used. During testing I noticed that at any focal length under 35mm, the sun would get extremely small on the frame, so the ideal objective should be somewhere in the 35-50mm range. Modelling the path of the solar eclipse in combination with the field of view of a 35mm and 50mm lens in SkySafari Pro and Planet Pro, showed that 50mm would be possible. However, the plan was to have a serious amount of mountain foreground as well, so 50mm might be just a bit tight. To keep the flexibility, I decided to bring the Leica SL 28-70 f/2.8. This allowed fine-tuning the composition on the spot.
No camera should ever be pointed directly into the sun without a protective filter. The filters of choice were the ASSF solar filters from Baader Planetarium. I picked up the sizes 65, 80 and 100mm, so that changes in lens choice could be made late in the process while still having an appropriate filter. This filters are very delicate and can be easily damaged, so I designed a little 3D printed box to transport them safely.
The Baader Planetarium ASSF filters are popular and high quality filters for solar imaging. They have very high contrast and no colour cast. They have an optical density of OD5.1, meaning they reduce the light by a factor of 125,000, or in photographic terms around 16 stops. They are EN ISO 12312-2:2015 certified, a qualification specific for solar filters.
First tests
The first tests were rather basic. Setup and alignment of the equipment, tracking accuracy, fitting the filters, focusing the lenses, quality of the images, and a general impression on exposure settings.
Course aligning the mount in daytime was done using the Astro Locator app. The latitude-specific inclination (Altitude) and compass north (Azimuth) were dialed in on the mount. After putting the camera on the mount, a GOTO command to the sun should get the sun in the image. In case it did not, a Televue sole-searcher with cold-shoe on the camera’s hot shoe helped with the adjustment of altitude and azimuth knobs. Finally the sun was placed straight in the cross-hairs on the screen using the hand controller. What I should have done at that point, was to sync that point as a one-star polar alignment. Or even a little later after some drift/re-adjustment for a two-star alignment. The good news is that also without the sync, alignment proved to be good enough to only have to manually adjust position once or twice during the two hour eclipse period.
Autofocus worked very well for the close-up shot. For the wide-field shot there was just not enough structure for the AF to lock on properly, so it had to be manually focused. Putting the filters on and off was relatively smoothly. The zoom-ring on the wide-field setup was taped to prevent the focal length to accidentally change during filter changes. For both setups, the exposure settings with solar filters in place were 1/500s, f/8, ISO100.
Both cameras were connected to a power bank attached to the tripod. These power banks have the energy of about 5 batteries. So there was plenty enough energy to shoot through the whole eclipse without having to worry about running out of juice.
Instead of using telescopes, regular mirrorless photo cameras were used. Both rigs during testing in the garden at home. Left the Leica SL3-P with SL28-70 f/2.8 lens. Right the Fujifilm GFX100 II with GF500 f/5.6 telelens and 1.4x extender the Rainbow Astro RST-135E equatorial tracking mount.
Planning and rehearsing the shots
During the partial phase of the eclipse, you don’t have to make photos very often, unless a high frame-rate video is planned. I decided to shoot every half minute. Both cameras have intervalometers integrated into their menu, so this was easy. The original plan was to go for once every minute, but the cameras would go into sleep mode between shots, which made things stressful around the start of totality where every second counts. Once every 30s was enough to keep the Leica on at all times, and the Fujifilm was easy to wake up.
From around 15-20s before totality, the conditions change very quickly. Different exposure settings are needed to capture different aspects. There is actually software that can plan each shot with millisecond accuracy and which can automate this process completely. A modern example is EclipseClick. Unfortunately at the time of the eclipse it did not support Fujifilm cameras. I contacted the developer and Fujifilm support is on the roadmap, but not finished yet. An alternative is to use a hardware interface between PC and camera (DSUSB), but I was too late for it to ship reliably in time and practise with it. Also I wanted to prevent adding a laptop to the setup. Laptops are hard to work with in bright daylight. You can keep them in black boxes, or cover your head with blankets etc., but it would take me further away from the actual experience. Photographing an eclipse already means working with technology a lot more than just enjoy the experience. I did not want to push that balance even further towards managing equipment.
So I developed a shooting sequence that should work well. This sequence was based on the advice given by Antoni Cladera in a recent YouTube video on the PhotoPills channel. For the detailed shot, I would start shooting about 15s before totality in 9-stops bracketing mode. During totality I would continue the bracketing, but with a base exposure of 1/15s, resulting in exposures up to 1s, to capture the corona. For the wide field shot timing was less critical and adjustments could be made during totality.
All the steps were written out in a sequence, and this sequence was rehearsed many times. The rehearsing was crucial, as it led to many small adjustments in the workflow to make things as easy and error-proof as possible. For both cameras I programmed custom settings and custom profiles to make most adjustments a single click event.
A timeline describing the critical moments in the shooting sequence for each camera setup. Custom settings and custom profiles helped making the workflow more fool-proof. But still I forgot to change the shutter speed on the wide field rig during totality.
A crucial aspect of this all is the exact timing. How do you know that you’re 15s before totality? For that purpose I can highly recommend the app Solar Eclipse Timer. You provide the app with your exact location (it can get that from the location service in your phone). And based on that information you get the exact times for the critical stages of the eclipse, from C1 (first contact) to C2 (start totality), C3 (end totality) and through to C4 (last contact). And most importantly, the app will talk to you at relevant times during the eclipse. So if you keep your AirPods in, you will hear the 60s before totality alert, the 30s before totality alert, and so on. This was extremely helpful. Rehearsing the shooting sequence was done using the practice session in the app.
Selecting the location
After all the planning and preparation at home, on August 9 we finally flew to Porto, Portugal, just a few hours drive away from our final destination. After an overnight stay in Porto, the following morning we drove up to Pandorado, a place in rural Spain which just a few days before had escaped from a dramatic nearby wildfire. As we approached, we drove through the affected area, and witnessed the sad destruction of so much beautiful nature.
Later that day and the following day we started to look for suitable locations. A lot of this work was prepared at home, using Google maps and the website of Xavier Jupier. The latter gives you super precise detail on all critical aspects of the eclipse anywhere you click on the map. And you can keep track of proximity to the center of the path of totality at all times. Another app/website that was used was Peakfinder. This allows you to put in your location data and visualize the location of the sun relative to the horizon, with very detailed modelling of mountains and other objects.
Peakfinder can make a simulation of the horizon for any place on earth. Ideal to check behind which mountain peak the sun will set and at which altitude.
The website of Xavier Jupier contains a wealth of eclipse information. Central on the site are the maps for each eclipse. Clicking on any location will give you this detailed overview of timing, duration and lots of other information about the eclipse when observed from that location.
We worked off a list of potential locations that looked promising. The goal was to have a nice backdrop of a mountainous area, especially for the wide-field shot. The trade-off would be that we would miss a bit of the last part before C4. In our area C4 would be around 1° above the horizon. Any bit of mountain would block at least the lower 3-5°, which was ok, but preferably not more than that. We were not the only ‘spotters’ in the region as we came across several other people doing the exact same thing. Spain expected almost half a million people to travel to the country just to watch the eclipse, so not surprising we met some of them.
Our preferred spot was at Los Barrios de Luna, which translates to something like ‘moonlit neighborhoods’, an applicable name. This is a big mountain lake formed by a massive dam that generates hydro-electric power for the region. There were many parking lots along the lake which all would work well. But we opted to hike up the mountain a little. An abandoned mercury mine was the perfect observation spot for the eclipse, if it were not for the electricity wires that would spoil the photography. But just a hundred meter or so away, there was a beautiful spot between the forests with excellent views on the lake and the eclipse (42.88355°N 5.85951°W). Unfortunately it was on a slope rather than a flat area, but this should not be too much of a problem.
When selecting the location for a solar eclipse, the advice is to always have a plan B as well. Clouds can destroy the best of plans, and if hours before the event the forecast is bad, having an option to drive to clearer skies can save your bacon. Our plan B was to drive south-east towards the Castilian plateau. Weather in the mountains can be unpredictable, the weather on the planes is much more stable and most often clear. During preparation a few potential locations were short-listed, but in all honesty, in the vast fields it would probably be possible to just park anywhere on little side-roads that run alongside the fields and setup there. So during our scouting, we decided not to drive there, but assume we would be able to find something suitable when we needed to.
The game is afoot
On 12 August 2026 we had a relaxed start of the day and kept a close eye on the weather. The coastal areas appeared covered in a thick layer of clouds. But the mountains were mostly clear. The only worrying signal were some smaller spotty clouds rising up in the mountains, something we had seen the day before as well. They were hard to predict, they could disappear as fast as they arrived. But they could also thicken up and keep hanging in the way, as there was not much wind to blow them away. We decided to take the risk and drove up to our planned location.
About 2.5 hours before the start of the partiality we were driving along the lake. The parking lots that yesterday seemed like great locations were packed full of people, cars, campers, tents, etc. A rock that I thought would be only just small enough to hold my two tripods, apparently could hold at least 10 people. It was obvious, this was a big happening with lots and lots of people all trying to do the same thing.
We went to our location and as it was more difficult to reach and not as obvious as potential viewing location, we were happy to see the spot was still available. There was one setup further up the mountain and several people walked by, experiencing it all as it happened. We could quietly start setting things up and getting prepared. The weather was a sweltering 35°C with a strong sun making it feel even hotter. We were happy to have some shadow from the nearby trees and settled regularly behind them to rehydrate and rest.
Setting up the equipment was straightforward and exactly as during numerous practise sessions. When dialling in the exact composition of the wide-field I settled on a focal length of 43mm, which seemed to be a nice middle ground between an impressive mountain background, the full path of the eclipse from start to end and decent sized solar disks. For the close-up shots, there was one scary moment when the Fujifilm camera showed an overheating warning. The cameras were setup in the blistering sun, and felt warm to the touch for sure. I pointed both towards the sun with the filters on. The filters would reflect most of the sun’s energy and the wide ring around the filters casted a bit of a shadow on the camera body. Then turned off the power until 10 mins before the start. This all seemed to work, as neither of the cameras did show a temperature warning since.
Well ahead of time everything was ready. It turned out that the mount was reasonably well aligned. During the hour of so that we had to wait for the eclipse to start, the sun had moved by perhaps half a sun diameter. Readjusting it shortly before both C1 and C2 was enough to cover the whole eclipse.
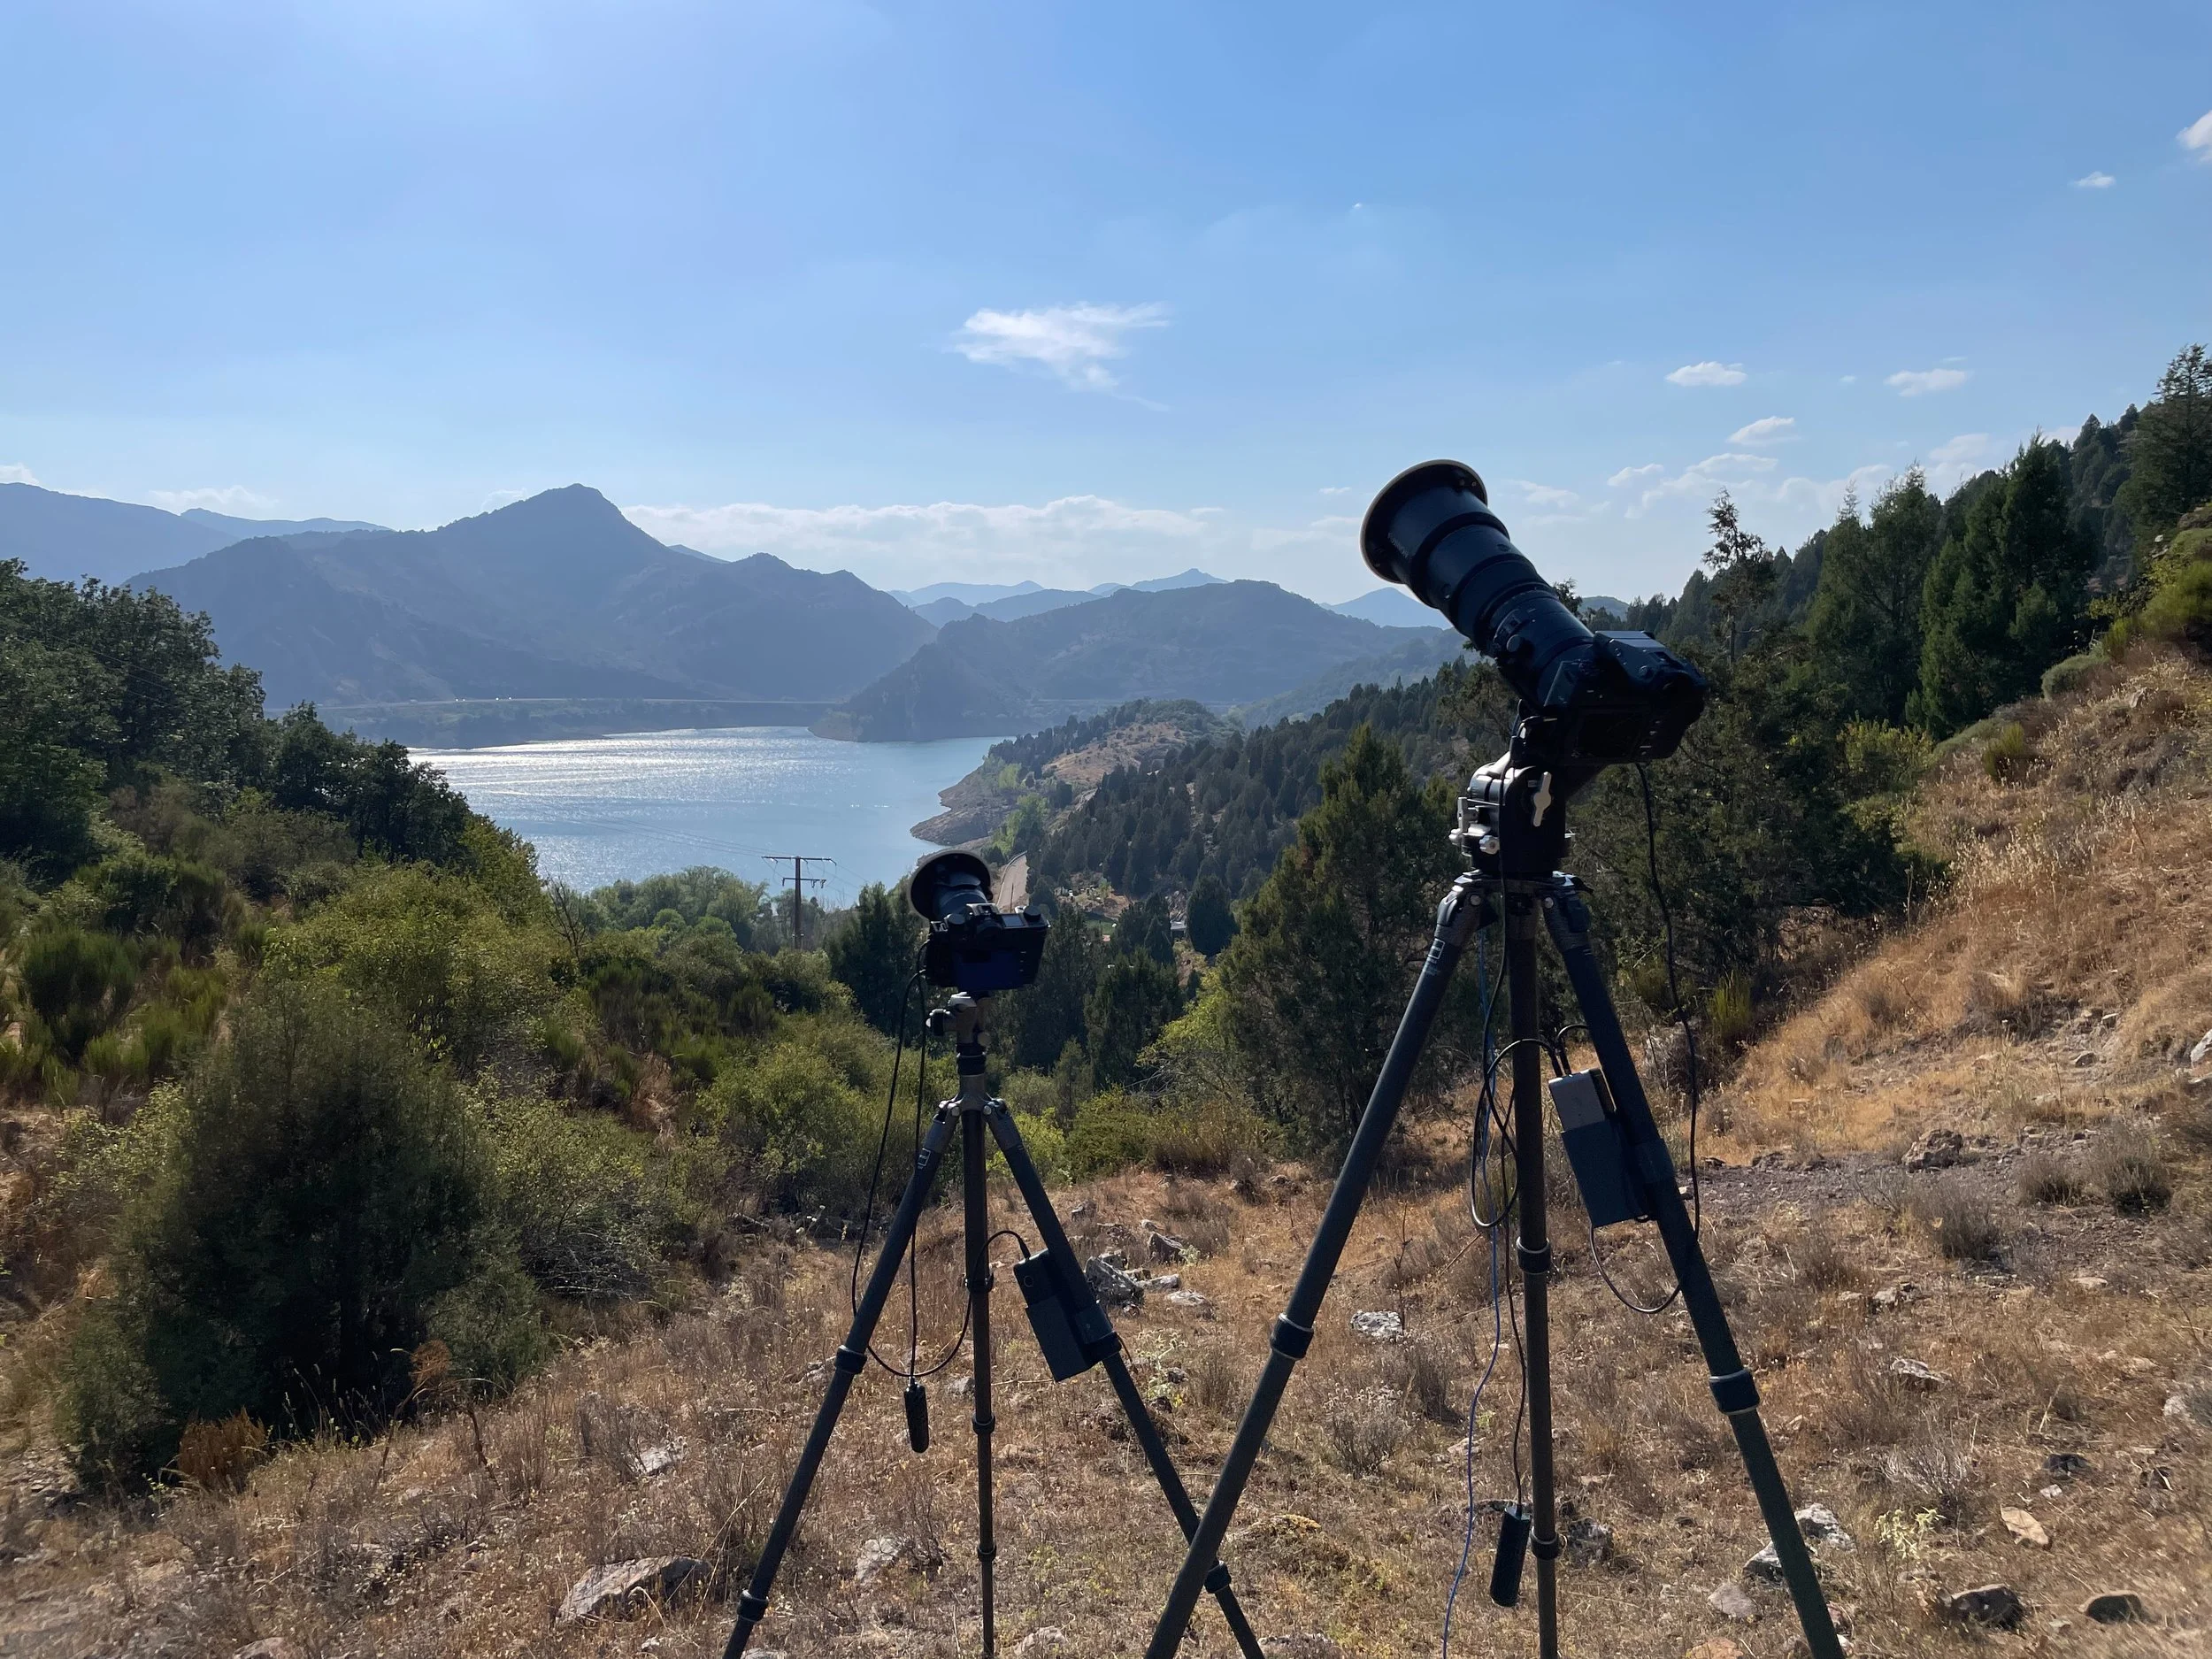
More than an hour before the start of the eclipse, both rigs were setup and aligned. The sky seemed reasonably clear.
The eclipse
The start of an eclipse is maybe not the most exciting part, but when the tiniest bite was taken from the sun, we realised that we would be witnessing one of nature’s most impressive astronomical events very shortly. The camera’s were clicking away nicely every 30s and the indent in the sun as witnessed on the screen of the camera, grew quickly to a sizeable chunk. During this phase the Solar Eclipse Timer did not say anything, which was a bit scary. Even more so because apparently while keeping the phone in my pocket while on, it had accidentally pressed the wrong button and the GPS data (and all timings) had disappeared. Getting it all back was just a 2 or 3 click process, so no worries there. But I did make sure that I had eye on the phone very regularly. As a suggestion for improvement the app could perhaps add more audible signals during this period, just to know everything is fine.
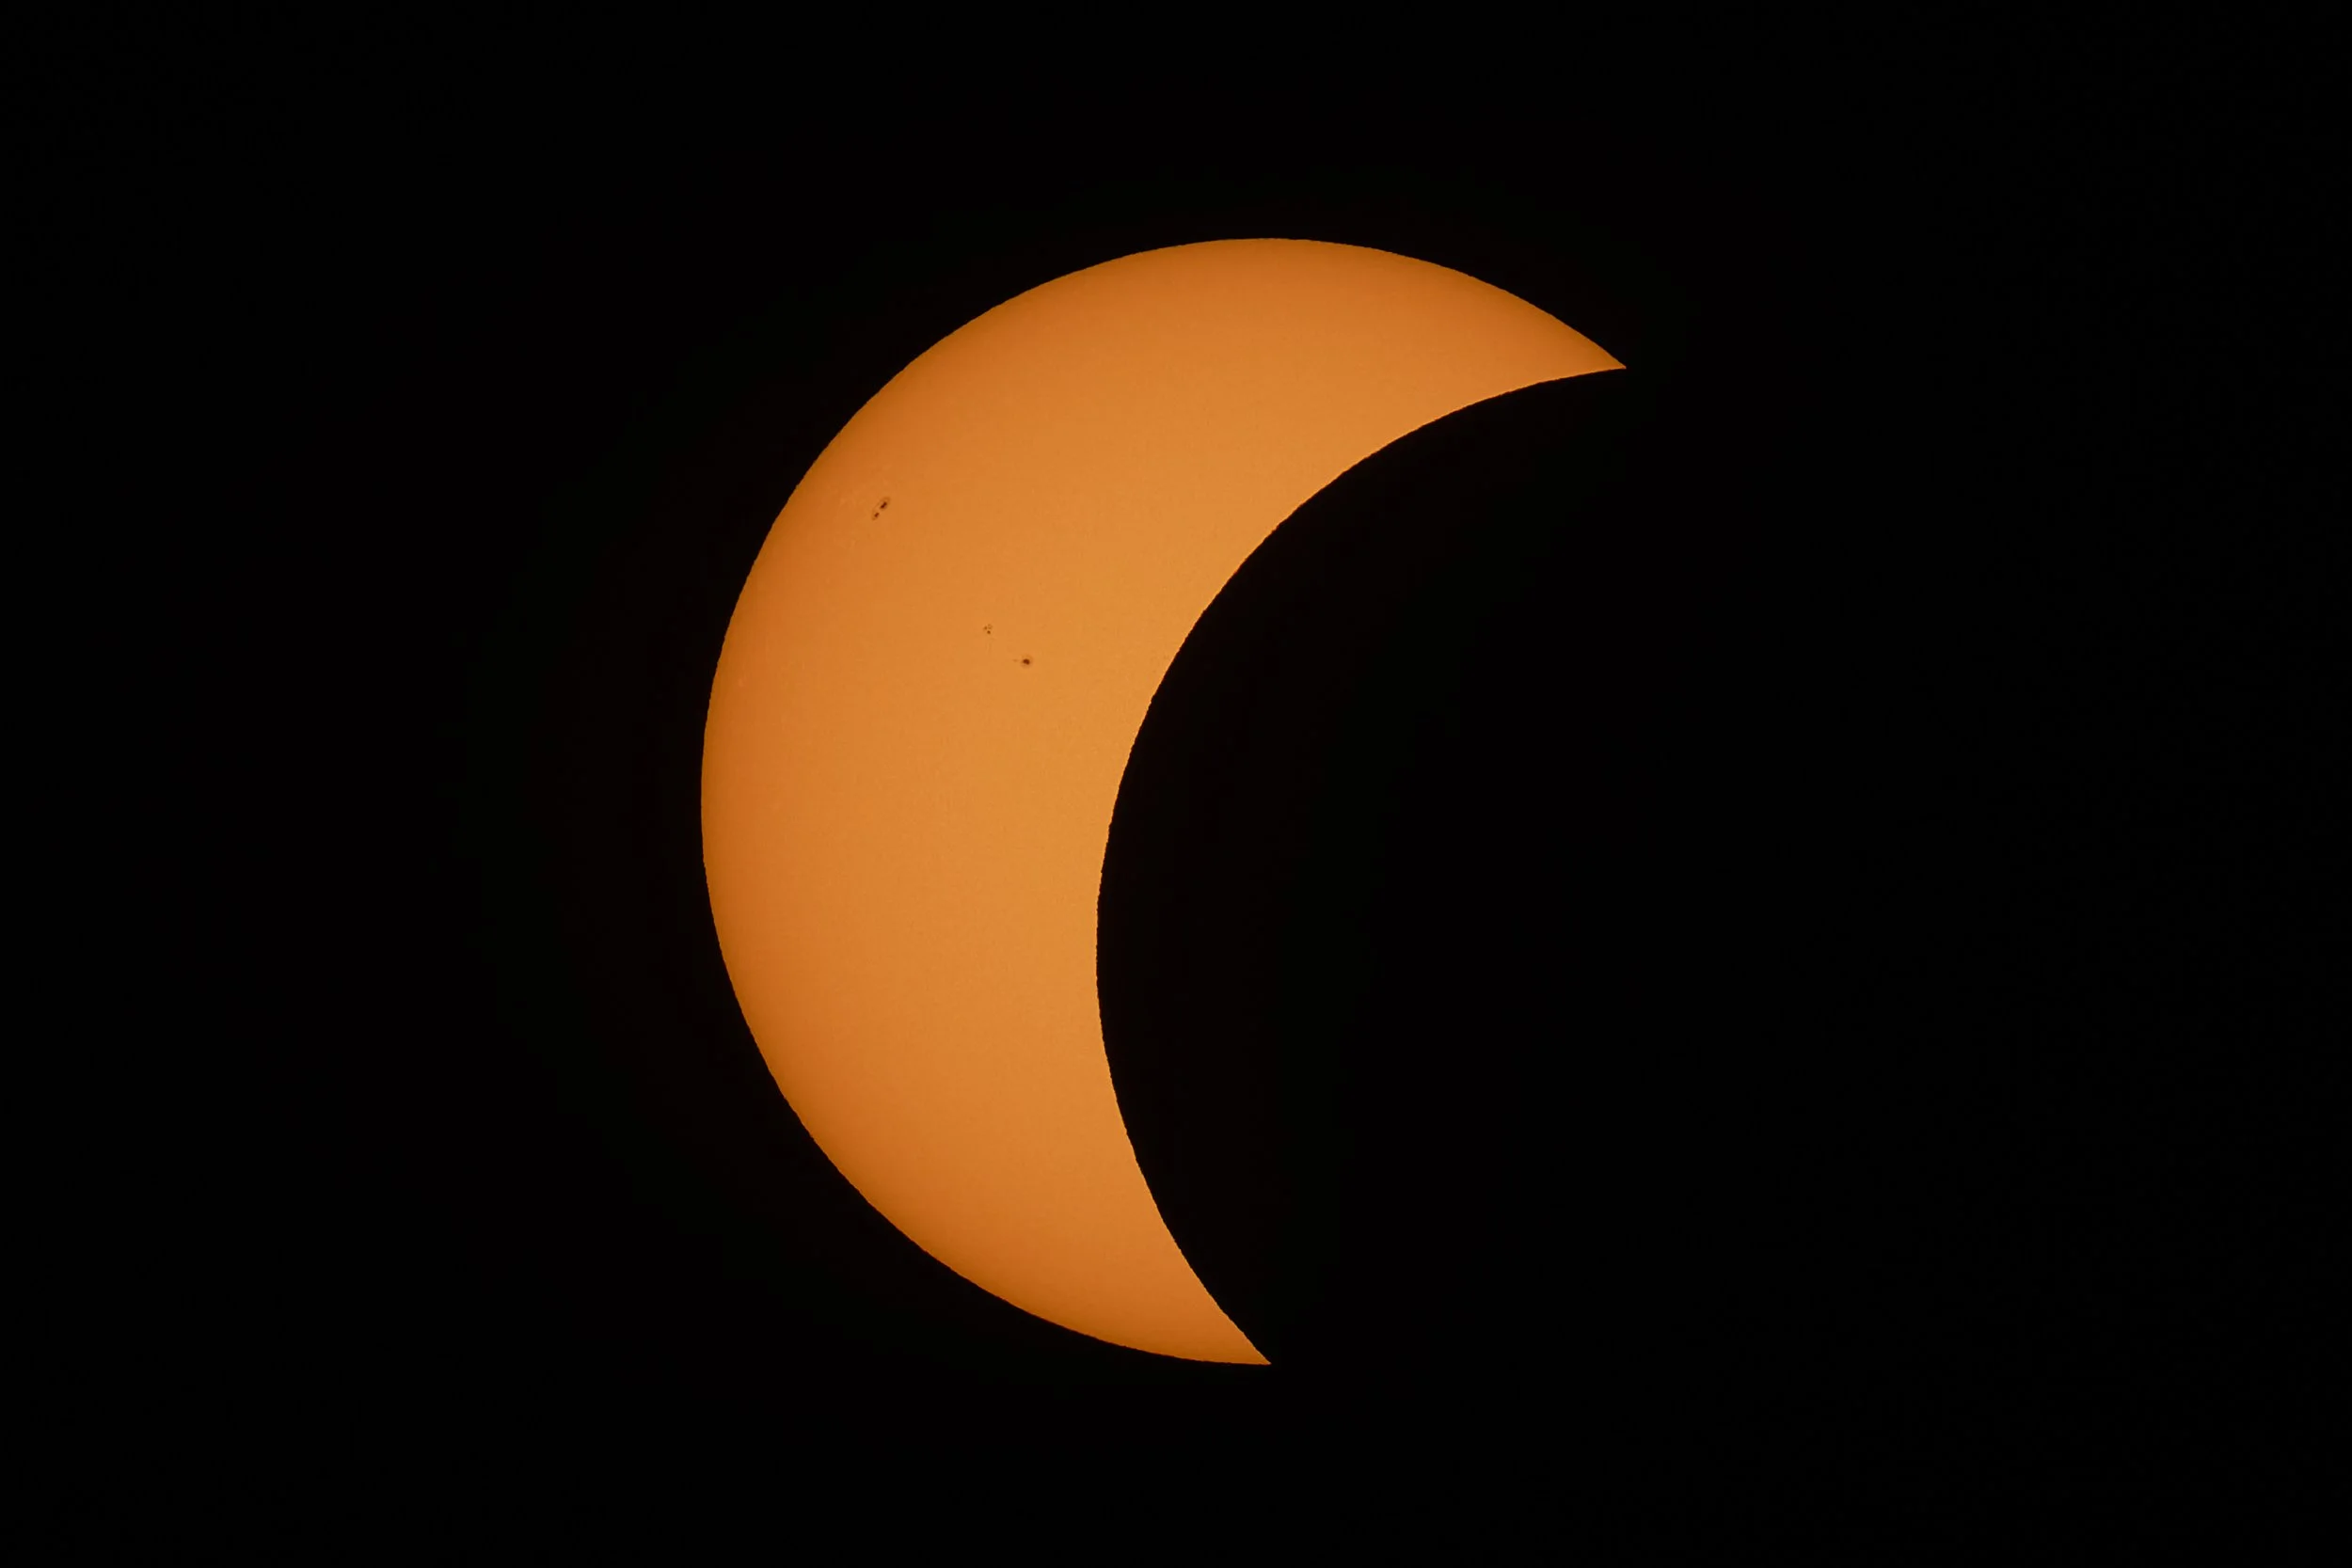
A single shot from the close-up rig, approximately halfway the first partial phase of the eclipse. Notice te sunspots well visible on the sun’s surface.
With an ever larger part of the sun eclipsed, the light changed significantly. It seemed a lot flatter and more grey than normal. Also temperature dropped by quite a bit, which was quite nice. We got closer and closer. One minute left before totality. Visualising the workflow for both cameras yet another time. Twenty seconds before totality. Time to take the filter off of the Fujifilm. Switch to next custom function and start shooting 9-shot brackets. Keep pressing the cable release while experiencing the last rays of light disappear behind the moon. Wow! We were all so stunned! Perhaps not night, but pretty dark nevertheless. Shouts and ohs and ahs from down at the lake. Switch to the next custom function (longer shutter times) and keep pressing the shutter for more bracketed shots. Take off the filter from the Leica, switch from interval shooting to bracketed shooting and keep pressing the cable release. Now on both cameras. The app indicates we’re at maximum eclipse now. Is this real? Yes, it is real, look at this, a total solar eclipse, wow! Just seconds more to go. Filter back on Leica. Fujifilm back to the previous custom function and keep shooting brackets. First light re-appears. A diamond ring, we can still watch with our eyes before the eclipse glasses go back up again. Leica back to interval shooting. Fujifilm back to original custom function. Ring of light re-appearing from the right. The best is over now. But what an experience! So impressed by what had just happened, I forgot to restart the interval shooting on the Fujifilm. After a few minutes I wondered why nothing showed up on the camera screen and realised the mistake. A quick press on the ‘go’ button and back on it, missing only a few minutes overall.
The diamond ring just after the filter was taken off the camera
Bailey’s beads showing up in the final seconds before totality
The corona, only visible using very specialised equipment, or during a total solar eclipse. Notice the massive solar flare on the left side of the disk.
The composite image from the wide-field setup, with a dramatic mountain range as the decor in which a total solar eclipse evolved just minutes before sunset.
It’s still not over. As the sun grows back to its normal shape, it becomes clear that a sun at 6° above the horizon is a lot weaker than at 15° above the horizon. Shutter speeds of both cameras needed constant adjustments to compensate. One remaining question is where exactly the sun will set. All planning apps aside, reality can still be different. It turned out that as the sun set, it was sliding off a mountain edge. Definitely nice, but unfortunately some small clouds in the way for maximum effect. Other than that, the weather had held up perfectly and almost the whole eclipse cycle had been visible in clear sky or at least a clear part of it.
As the sun reappears from behind the moon, it slides down the mountain and slowly sets behind te horizon.
Time to pack up, as it got dark quickly now. As we drove back along the lake, the parking lots that had been so crowded a few hours ago were mostly abandoned, with the exception of a few campers. Back in the hotel we went out soon again, this time to watch the Perseïds meteor shower. Unfortunately lights around the hotel spoiled it a bit, but still we could see several pretty bright meteors. What a great finish for a day that had left us with such impressive memories.
Image processing
Our stay in Spain lasted a bit longer, enjoying the beautiful north-west. So image processing did not start until back home a week later. A total of 853 images had been shot and it was time to process them into the images that were planned from the start, as well as some additional ones.
It was during processing that one mistake came to light. For the wide field image you want to shoot the background image separate from the eclipse images, and then put them together in a composite. The best way to do this is during the totality of the eclipse by shooting an image with a much longer shutter time. This was planned, but I had forgotten to change the shutter speed. For the eclipsed sun this was not so much of an issue. Within the bracketed shot there was enough exposure to let the corona come out well. But the background could not be recovered without an immense amount of noise and banding. Luckily I had kept shooting until after the sun had set, so could use those as backgrounds. The reddish sky over the mountains actually added a nice impact to the composite.
The photo I spent most time on was the corona photo. To bring out the details in the corona’s structure one can apply various techniques, and I probably tried them all. In the end I settled for the first approach, a technique presented by Nick Carver from Nebula Photos. Further specific images and composites were created to showcase the many aspects of this wonderful phenomenon of a total solar eclipse.
Details on the processing can be found in the images section on the dedicated page for this eclipse.
Conclusion
A lot of preparation and planning went into observing and photographing this total solar eclipse. But as so often, preparation pays off, and I ended up mostly with the images I was looking for. It was an exciting journey through a part of astrophotography that was less known to me. Very few things that I would have done differently with hindsight, if any. Next year there’s another total solar eclipse. On 6 August 2027 the totality will last much longer. It is also visible from Spain, but from the far south. Better visibility is probably in Egypt. No firm plans have been made yet, but it is very tempting to go. We were all super impressed by the event and if you’re ever in the position to experience a total solar eclipse, it definitely comes highly recommended.